Introduction
This tutorial describes how to use CIShell's Algorithm Development Wizard to integrate a compiled program into CIShell as a Static Executable algorithm. Although it uses an example program written in C++, the steps taken to integrate programs written in other languages are not significantly different.
Prerequisites
Similarly to Practical Java Algorithm Development, we recommend that you read CIShell Basics and run through the Hello World Tutorial if you are not already familiar with basic CIShell development. You will need to have Eclipse and the CIShell Java Algorithm Wizard installed, as described inEnvironment Setup. The algorithm produced in this tutorial requires the Network Workbench environment to be executed.
If you plan on following this tutorial step by step and integrating the example C++ program, you should have a solid understanding of the C++ language and how to compile for your target platforms as well.
Section Table of Contents
Creating a Non-Java Program
The example non-Java program we will be integrating in this tutorial is written in C++ and will combine three files and output them to a fourth, new file. The names of all four files will be specified as command-line arguments. These arguments are:
- A user-chosen file of any type.
- A Network Workbench network file selected off of the Data Manager.
- The name of a plain text "platform" file.
- The name of the output file.
The contents of the platform file should describe the user's platform (i.e. "Win32" or "linux.x86"). Note that this file is only meant to demonstrate the use of related files in the wizard (link), and thus it is not meant to be customizable by the end-user. As you will see in later sections, that functionality will be reflected in various aspects of the project setup.
The output file will contain the copied contents of the end-user-chosen file, the Network Workbench network file the end-user selected on the Data Manager, and the platform (from the platform file). This (file name) will be "hard coded" in the sense that the end-user will not be able to customize it.
This program will read the contents of the end-user-chosen file, the NWB file selected off of the Data Manager, and the platform file. It will then output the contents of all three files to a new file. This program has basic error handling and user notifications as well. The source code for this program can be obtained either from the Example C++ Program Source Code section or the Resources section.
Once the program has been written (or copied and pasted), it must be compiled for all of the platforms you wish to support. If you wish to compile the code yourself, we recommend using the GCC family of compilers for C and C++ programs to maintain cross-platform compatibility. (MinGW is a good choice for Windows.) Otherwise, you may download the download the compiled code in the Resources section.
For the sake of this tutorial, call the program NonJavaAlgorithmWizardExample (source file NonJavaAlgorithmWizardExample.cpp), and compile it for at least one platform.
Creating the Plugin Project
Now that your program is compiled for all of the platforms you wish to support (or you have obtained the appropriate resources), it is time to integrate the necessary files into an Eclipse plugin. Once you have opened Eclipse, go to File->New->Project..., and expand the CIShell group of wizards.
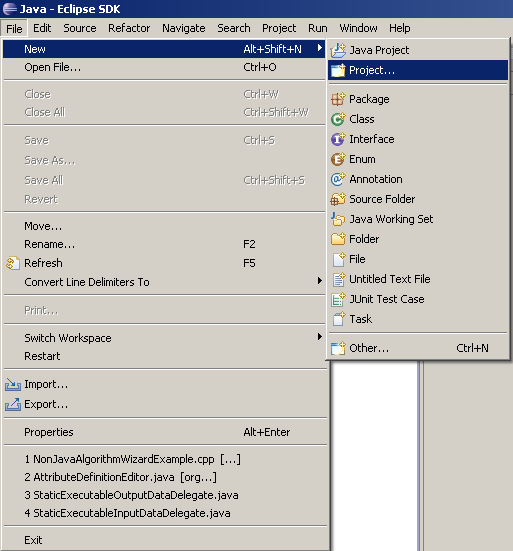
Figure 1: File->New->Project...
In the New Project window, select Executable (command line)/non-Java Algorithm Project, and press Next >.
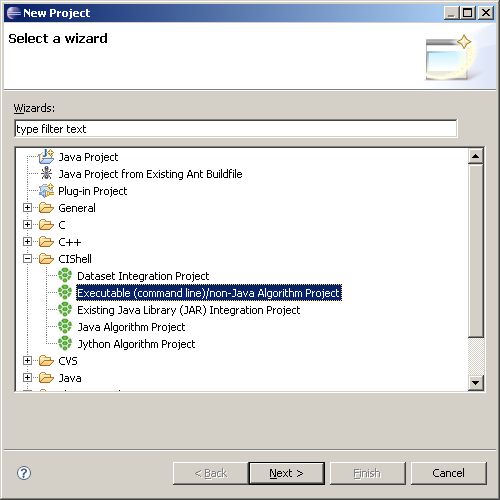
Figure 2: Available CIShell algorithm projects.
The first page of the wizard is for specifying the name for your Eclipse project. As a matter of convention, we usually make the Project name, Bundle Name, and Bundle Symbolic Name identical for CIShell plugins. For the sake of this tutorial, enter example.nonjava.algorithm and click Next >.
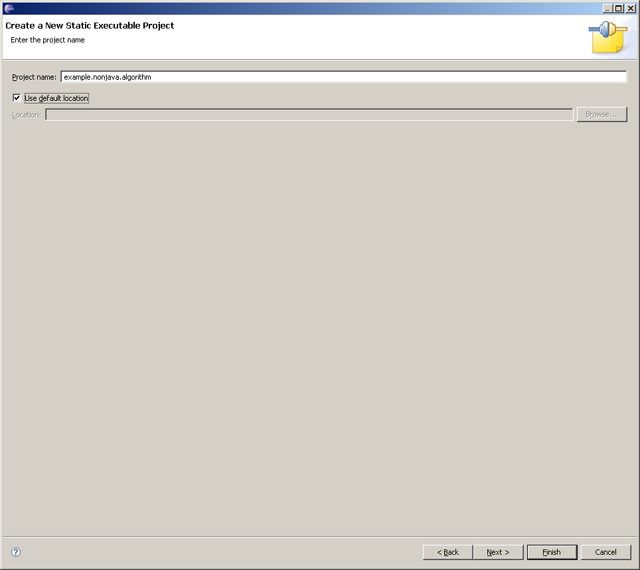
Figure 3: Creating a new project.
The second page is the Bundle Properties page, which lets you enter a Bundle Name, Bundle Symbolic Name, and Bundle Version. As mentioned before, make the Bundle Name and Bundle Symbolic Name the same as your Project name (which, in our case, is example.nonjava.algorithm), leave the Bundle Version at 0.0.1, and click Next >.
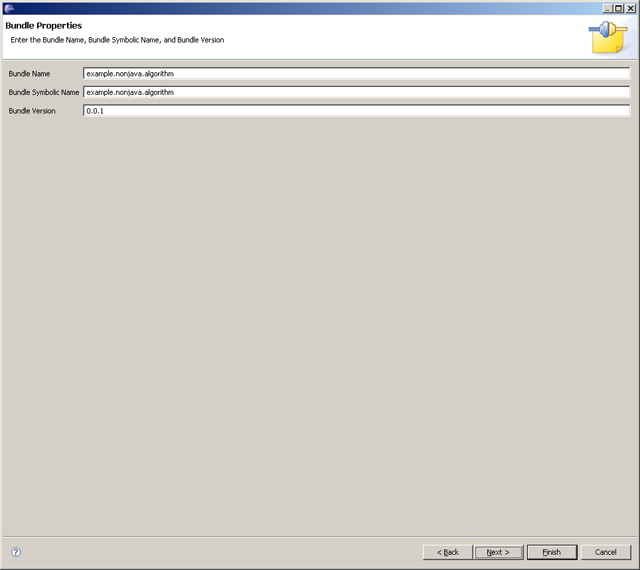
Figure 4: Filling in the Bundle Properties.
The third page is the Executable Files page, which is where the Executable Name and all executable files are specified.
The name of your program (minus the file extension if you use Windows) should be identical across all platforms. (In our case for this tutorial, it would be NonJavaAlgorithmWizardExample.exe in Windows and just NonJavaAlgorithmWizardExample in Linux and MacOSX.) The '''Executable Nam'e field on this page should also be identical to the name of your program.
If you have any platform-independent files that your program will always need to access, you can use the Choose Common Files file selection widget inside the Platform: Common to All section.

Figure 5: The Choose Common Files file selection widget inside the Platform: Common to All section.
This widget allows you to specify as many common files as you want. To add another file selection field, choose a file in the last file selection field of the widget. The first file selection field has a Clear? button that will clear the file selection. All other file selection fields have a Remove? button that will remove its respective file selection field.
Each of the other sections specifies a platform and allows you to choose the executable file (via the Choose Executable File file selection widget) and related files (via the Choose Related Files file selection widget) for that platform. Note that each Choose Related Files widget behaves the same way as the Choose Common Files widget under the Platform: Common to All section.
If you have not already, compile your program for at least one platform. For all of the platforms you compiled your program for, choose the appropriate executable files and create a file named platform.txt that contains the name of the platform. In our case, we have a platform.txt that contains the text "I'm on Windows!" and another platform.txt that contains the text "I'm on Linux!". Click Next >.

Figure 6: The Executable Name has been specified, and the Executable Files and their Related Files have been selected.
The fourth page is the Project Properties page, which allows you to specify various metadata about your algorithm, including how it is placed in the menu system. For this tutorial, choose to have your algorithm on the menu (by checking the 'On the Menu check box), and specify Preprocessing as the Menu Path. If you want, you can fill in the metadata fields, but it is not necessary for this tutorial. Click Next >'''.
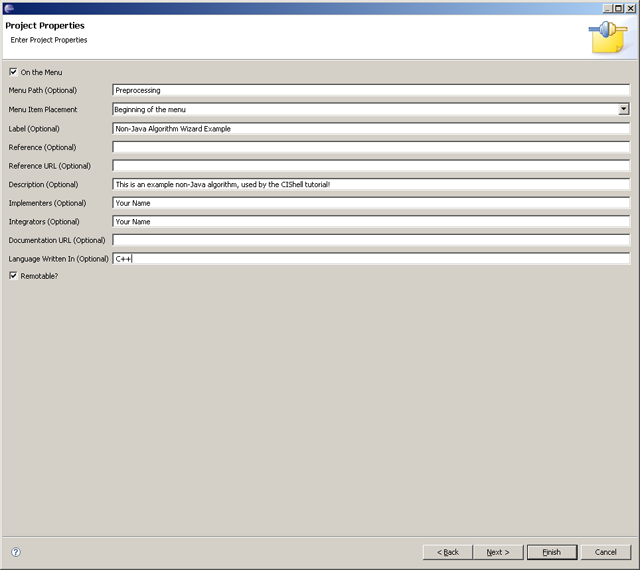
Figure 7: The algorithm will be placed on the Preprocessing menu.
The fifth page is the Algorithm Parameters page. It allows you to specify what input parameters are needed to execute your algorithm from the end-user. You can use the Add button to add as many input parameters as needed. There are several different types of input parameters, including strings, numbers, files, and directories. When the algorithm is executed by the end-user, this list of input parameters is used to create a GUI for the end-user to input appropriate data.
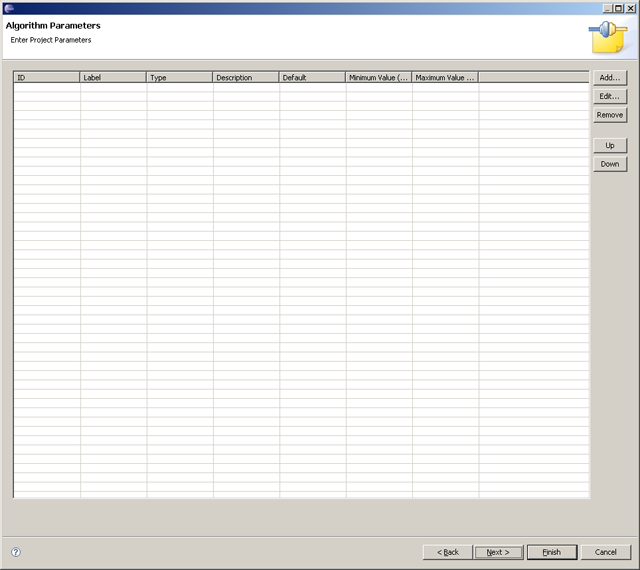
Figure 8: The Algorithm Parameters page.
The ID field for each input parameter is used as a key to obtaining the values provided by the user. Each ID should be unique and should only contain alphanumeric characters. The Label field is what is displayed to the end-user, and it may contain any character. The Description field describes to the end-user what the field is used for. The Type field specifies what type of data is valid for the input parameter. If a default value is appropriate (i.e. the input parameter is not a file or directory the end-user chooses), the Default field stores the default value for the input parameter. Finally, if the type of data is a number type (i.e. Integer, Long, Double, etc . . .), the Minimum Value and Maximum Value fields can be used to specify constraints on what the end-user may input.
For our example algorithm, we will require one input parameter, which will correspond to the user-specified file (mentioned earlier in this tutorial).
Click the Add button, and give the input parameter the following values: Unique ID: user_file Label: Choose a File Input Type: File Description: The contents of this file will be copied to the output file.
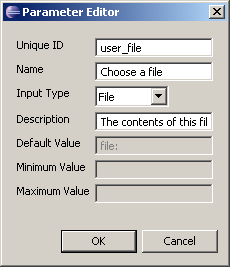
Figure 9: Adding the input parameter.
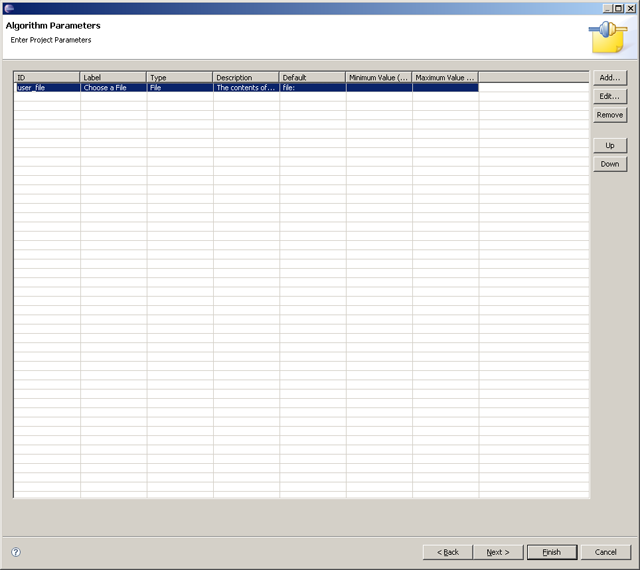
Figure 10: The Algorithm Parameters page with the input parameter specified.
Click Next >.
The sixth page is the Input and Output Data page. It allows you to specify the input data that your algorithm requires off of the Data Manager (in Network Workbench) and the output data that your algorithm outputs to the Data Manager after successful execution.
The example algorithm in this tutorial expects one item off of the Data Manager, so click the Add button under the Input Data section to add a new input data item. For the Mime Type, input text/nwb.
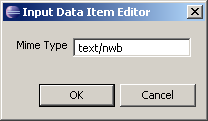
Figure 11: Adding the input data item.
The example algorithm in this tutorial also outputs one item on to the Data Manager, so click the Add button under the Output Data section to add a new output data item. Give the output data item the following values: File Name: output.txt Label: Example Non-Java Algorithm Output File Data Type: Text Mime Type: text/plain
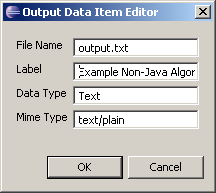
Figure 12: Adding the output data item.
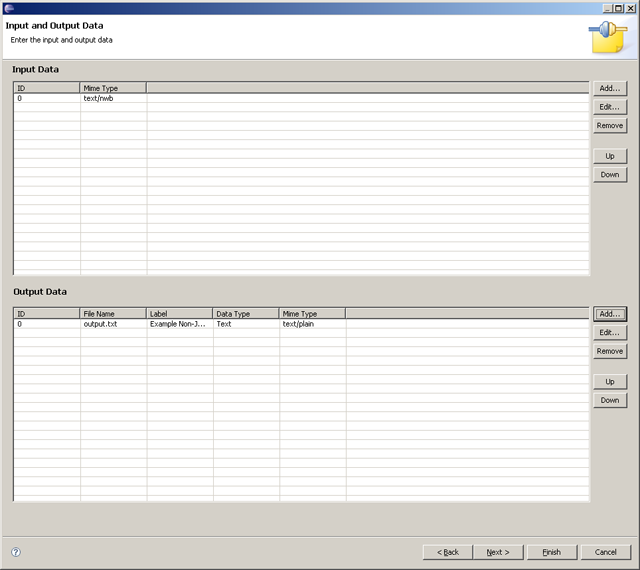
Figure 13: The Input and Output Data page with the input and output data items specified.
The seventh page is the Template String page. The template string tells CIShell what command-line string to use when invoking your compiled program. It can contain placeholders that correspond to either values specified by the end-user (as input parameters) or the files chosen from the Data Manager by the end-user (as input data items). A placeholder is specified in the template string by the text _$
{placeholder}
, where placeholder is either the _ID of an input parameter or inFile[input file number]. If you recall from earlier in this tutorial, we specified that our algorithm will accept one input parameter, which has the id of user_file, so the corresponding placeholder in a template string would be _$
{user_file}
. In the previous page, we specified an input data item of type _text/nwb and an output data item with the name output.txt. Our input data item has the corresponding template string placeholder _$
{inFile\[0\]}\_.
The example program expects command-line arguments of the form: user_file nwb_file platform_file output_file Click the first item in the Template String Placeholders table (which should be the Choose a File... entry), and then click the Insert button. The text
"${user_file}"
(quotes included) should appear in the Template String field.
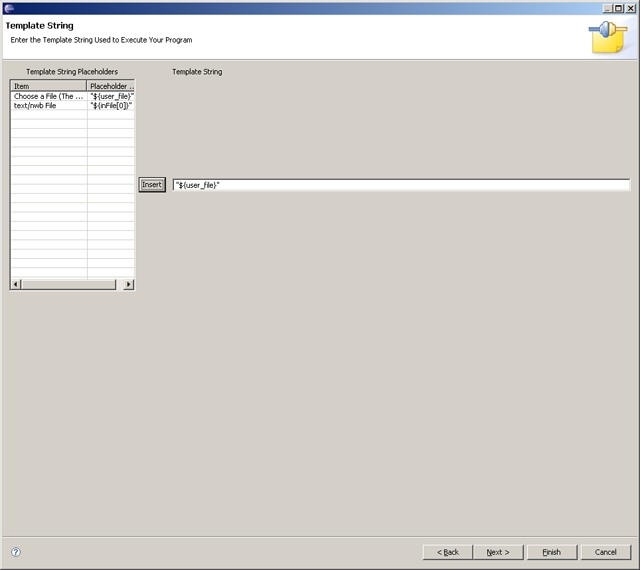
Figure 14: The first template string placeholder has been inserted.
Repeat this process again, except this time select the second item in the Template String Placeholders table (which should be the text/nwb File entry). After that, append the text "platform.txt" and "output.txt" (quotes included) to the template string.
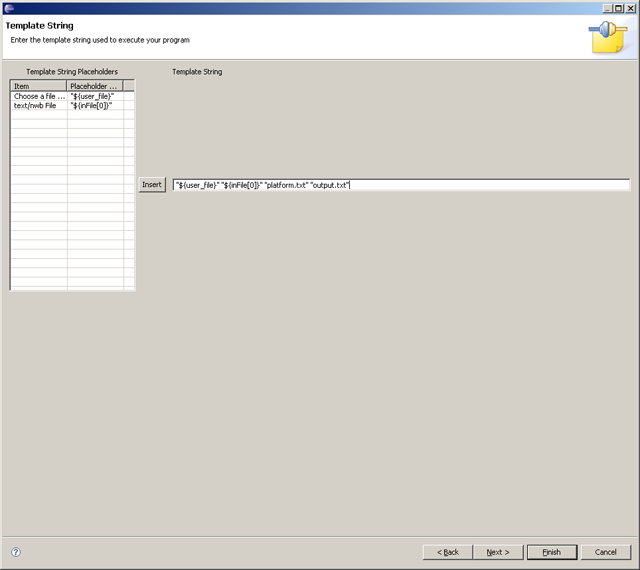
Figure 15: The final template string, containing the input parameter placeholder; the input data item placeholder; the platform file; and the fourth argument the example program expects, which the name of the file to output to.
The eighth and final page is the Source Code Files page. It lets you choose a single file for your source code, if you wish to include your source code in the CIShell algorithm. Most likely, your source code will consist of multiple files, so you will need to archive them into a single file first. For this tutorial, however, the .cpp source file can be chosen since it is the only one involved in compiling the example program. 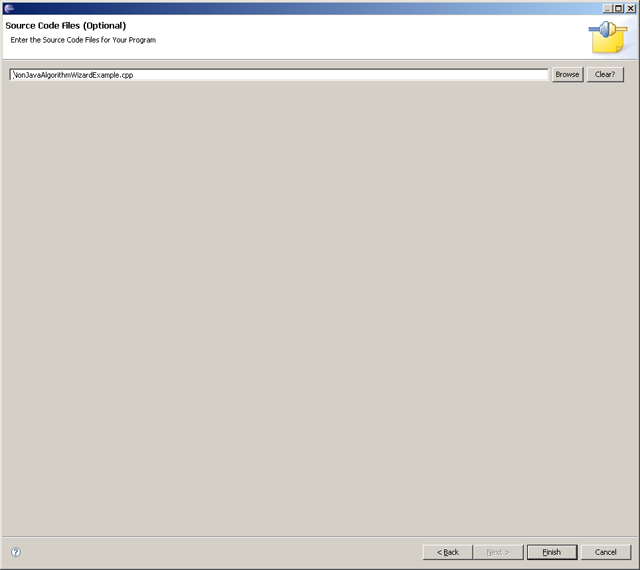
Figure 16: The .cpp source code file has been chosen.
You should now have a new project in your Eclipse workspace.
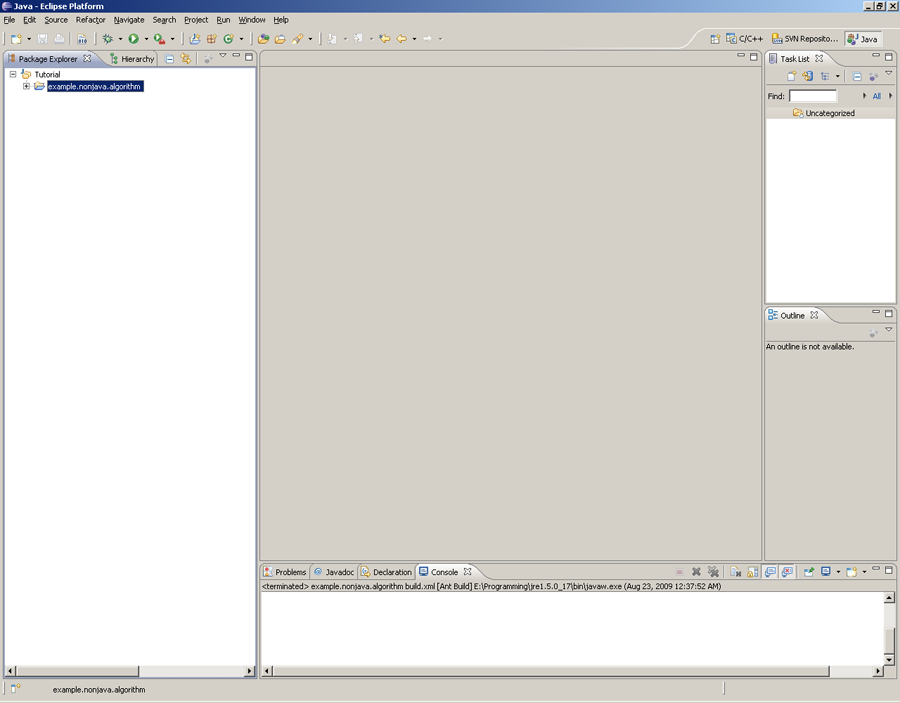
Figure 17: The new project in the Eclipse workspace.
Building the Project
Now that you have an Eclipse project for your algorithm, the next step is to build the project. Fortunately, it is just a matter of running the build.xml Ant script that was created with your project. Right-click on the build.xml file and select Run As->Ant Build to build the project.
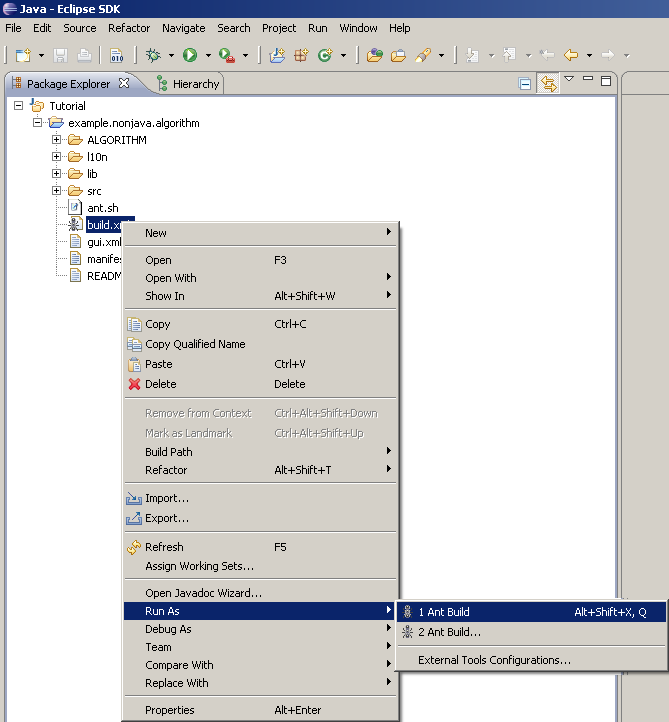
Figure 18: Building the Eclipse project.
Your project should build successfully, and you should see output in your console that reflects this.
Exporting the Project
Now that your project has been built, it can be exported as a plugin for Network Workbench. Refresh your workspace. (You can do this by right-clicking on your project in the Package Explorer and selecting Refresh.) You should see a new build directory. Expand it. Inside of it should be an out directory and a file called projectName_bundleVersion.jar, where projectName and bundleVersion were specified in the wizard. (For this tutorial, the file would be called example.nonjava.algorithm_0.0.1.jar.) Right-click on this file, and select Export...
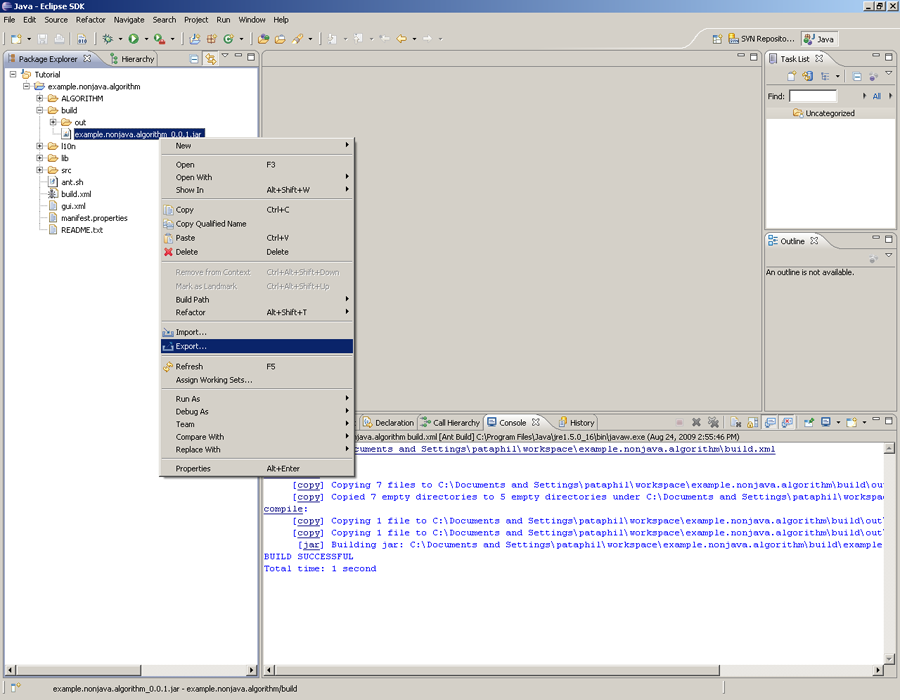
Figure 19: Exporting the built Network Workbench plugin.
The Export window should open. Select General->File System, and click Next >.
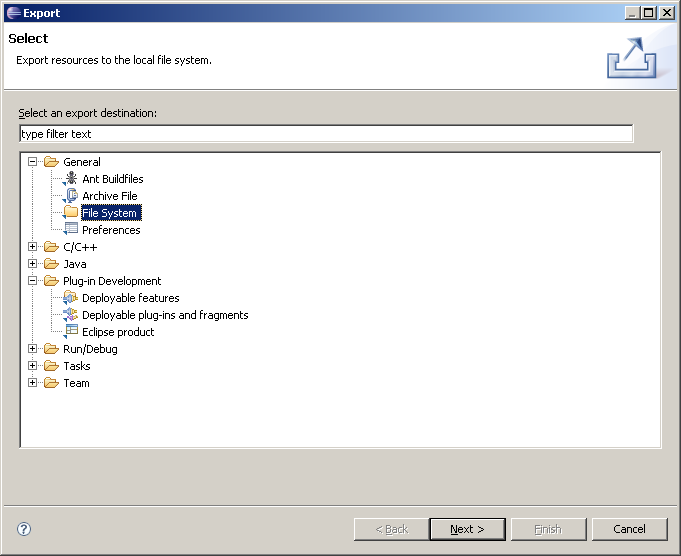
Figure 20: Exporting the built Network Workbench plugin.
The next page will allow you to select the files you want to export and where on your file system to export them. On the left hand side, select the build directory, and make sure the appropriate jar file (i.e. example.nonjava.algorithm_0.0.1.jar) on the right hand side is checked. Both of these should be done by default.
Select the plugins directory inside your Network Workbench installation (e.g. C:\Program Files\NWB\plugins), and then click Finish. (Note: If this plugin already exists in your Network Workbench installation, you will be prompted to overwrite the already-existing file. Just click Yes.)
Figure 21: Exporting the built Network Workbench plugin.
Once your algorithm plugin has been exported and you have loaded Network Workbench, your algorithm will be on the menu that you specified. When you run the algorithm, a window should open that displays the file selection input parameter you specified on the Input Parameters page.
Additional Information
Since development is almost always an iterative process, you will probably want to modify your algorithm project after creating it through the wizard. This section will explain the various components of non-Java algorithm projects in Eclipse and how you may want to modify them.
Let's start with the file gui.xml in the root directory of your project. Notice the OCD section. The name here should match your project name (projectName), and the id should be projectName.gui. Each AD element inside this section corresponds to an input parameter for the GUI that the end-user sees when running your algorithm.
For this example, there should be only one AD, and its attributes should match what you entered earlier in this tutorial. You can change the name and description attributes without affecting anything else in your algorithm, but if you change the id, you will need to reflect that change in your template string (which we will get to). If you notice the default and how its contents are "file:", file and directory fields are actually String fields (type="String") with "file:" and "directory:" prefixes, respectively.
Now take a look at the Designate section. The pid should match your project name as a matter of convention, but does not have to. However, the Object ocdref value inside this section must match the OCD id specified above.
Open the manifest.properties file. This is where the Bundle Name (Bundle-Name), Bundle Symbolic Name (Bundle-SymbolicName), and Version (Bundle-Version) properties from the wizard ended up. Again, as a matter of convention, the Bundle Name and Bundle Symbolic Name properrties should match your project name.
You will almost never need to touch the rest of the files in this directory nor the files in the l10n and lib directories. The src directory is where your source code ended up, so you can import additional files to it for your source code if you wish.
Expand the ALGORITHM directory. This is where the sub-directories for the different platforms are located. Any common files (to all platforms) chosen on the Choose Executable Files page ended up in the default directory. For the specific platforms, both the executable files and related files ended up in their respective directories. (For example, the Windows executable file and the platform.txt file that we chose as its related file ended up in the win32 directory.) If you wished to change the sets of files for the various platforms, these directories are where you would want to do that. Keep in mind that the executable files themselves must all have the same base name (i.e. NonJavaAlgorithmWizardExample for Linux, NonJavaAlgorithmWizardExample.exe for Windows, etc.).
Open the config.properties file. This file contains data on how your program works with CIShell. (CIShell is the framework that Network Workbench is based on. Although we used it in this tutorial, this process of creating algorithm plugins will work for any CIShell-based application.) The executable property must match your base executable file name (as specified on the Choose Executable Files page in the wizard).
The template property is the template string specified in the wizard. Notice that it starts with
"${executable}"
, even though we did not specify that in the wizard. That is replaced by the _executable property. The template string is actually a command-line string that gets executed, which is why the executable is specified first (to invoke your program). That is also why everything is wrapped in sets of quotes (in case spaces are involved).
Notice that no input data is specified here, but output data is (the outFile properties). The input (and output) data must be files for non-Java algorithms, and as such the only metadata relevant to it is the expected mime-type of each input data item. The mime types for all of your input data items are specified in the service.properties file, which we will get to. outFile can be thought of as an array of output data items, indexed into via C-style bracket notation (i.e. outFile[0]). Setting an outFile to a file name declares the output data item. The label of each outFile is what is displayed for the output data item in the Data Manager (in Network Workbench), and the type tells the Data Manager what icon to use. The mime-type must also be specified for each outFile, but like the input data, that is done in service.properties.
Finally, open up service.properties. The service.pid property here must match the one specified in the Designate section in your gui.xml file. The in_data and out_data properties are the mime-types of the input and output data items mentioned above. They are merely comma-separated lists. The menu_path defines where your algorithm should be placed in the menu in Network Workbench, and the label property corresponds to the label in the menu. All of the other properties are metadata.
Example C++ Program Source Code#include <exception>
\#include <iostream>
\#include <fstream>


\#define PROGRAM_NAME "NonJavaAlgorithmWizardExample"
\#define EXPECTED_ARGUMENT_COUNT 5
\#define USER_FILE_ARGUMENT_INDEX 1
\#define NWB_FILE_ARGUMENT_INDEX 2
\#define PLATFORM_FILE_ARGUMENT_INDEX 3
\#define OUTPUT_FILE_ARGUMENT_INDEX 4

std::string readUserFile(const std::string& userFileName)
throw(std::exception);
std::string readNWBFile(const std::string& nwbFileName) throw(std::exception);
std::string readPlatformFile(const std::string& platformFileName)
throw(std::exception);
std::string readFileContents(std::ifstream& inputFileStream);

void outputCombinedContentsToFile(const std::string& userFileContents,
const std::string& nwbFileContents,
const std::string& platformFileContents,
const std::string& fileName)
throw(std::exception);

int main (int argumentCount, char\* arguments\[\]) {
if (argumentCount < EXPECTED_ARGUMENT_COUNT) {
        std::cerr << "You must provide " << EXPECTED_ARGUMENT_COUNT - 1;
        std::cerr << " arguments to the program." << std::endl;
        std::cerr << "Expected format:" << std::endl;
        std::cerr << "user_file nwb_file platform_file output_file";
        std::cerr << std::endl;
    } else {
// Process the end-user-specified file.

std::string userFileName = arguments[USER_FILE_ARGUMENT_INDEX|USER_FILE_ARGUMENT_INDEX];
std::string userFileContents;

try {
            userFileContents = readUserFile(userFileName);

            std::cout << "Successfully read the file you specified \'";
            std::cout << userFileName << "\'." << std::endl;
        } catch (std::exception& readUserFileException) {
            std::cerr << "There was an error reading your file \'";
            std::cerr << userFileName << "\': \"";
            std::cerr << readUserFileException.what() << "\"" << std::endl;

            return 1;
        }

// Process the NWB file.

std::string nwbFileName = arguments[NWB_FILE_ARGUMENT_INDEX|NWB_FILE_ARGUMENT_INDEX];
std::string nwbFileContents;

try {
            nwbFileContents = readNWBFile(nwbFileName);

            std::cout << "Successfully read the NWB file you selected off of ";
            std::cout << "the Data Manager (\'" << nwbFileName << "\').";
            std::cout << std:: endl;
        } catch (std::exception& readNWBFileException) {
            std::cerr << "There was an error reading the NWB file \'";
            std::cerr << nwbFileName << "\': \"";
            std::cerr << readNWBFileException.what() << "\"" << std::endl;
        }

// Process the platform file.

std::string platformFileName = arguments[PLATFORM_FILE_ARGUMENT_INDEX|PLATFORM_FILE_ARGUMENT_INDEX];
std::string platformFileContents;

try {
            platformFileContents = readPlatformFile(platformFileName);

            std::cout << "Successfully read the platform file \'";
            std::cout << platformFileName << "\'." << std::endl;
        } catch (std::exception& readPlatformFileException) {
            std::cerr << "There was an error reading the platform file \'";
            std::cerr << platformFileName << "\': \"";
            std::cerr << readPlatformFileException.what() << "\"" << std::endl;

            return 1;
        }

/\*
* Combine the user-specified file contents and the platform file into
* the user-specified output file.
\*/

std::string outputFileName = arguments[OUTPUT_FILE_ARGUMENT_INDEX|OUTPUT_FILE_ARGUMENT_INDEX];

try {
            outputCombinedContentsToFile(userFileContents,
                                         nwbFileContents,
                                         platformFileContents,
                                         outputFileName);

            std::cout << "Successfully wrote the combined contents to the ";
            std::cout << "file \'" << outputFileName << "\'." << std::endl;
        } catch (std::exception& outputCombinedContentsToFileException) {
            std::cerr << "There was an error outputting the combined contents";
            std::cerr << " of the file you specified and the platform file ";
            std::cerr << "to the file \'" << outputFileName << "\': \"";
            std::cerr << outputCombinedContentsToFileException.what();
            std::cerr << "\"" << std::endl;
        }
}

return 0;
}

std::string readUserFile(const std::string& userFileName)
throw(std::exception) {
std::ifstream userFileStream(userFileName.c_str(), std::ifstream::in);

if (\!userFileStream.is_open()) {
        throw std::ios_base::failure("Unable to open user file for reading.");
    }

std::string userFileContents = readFileContents(userFileStream);
userFileStream.close();

return userFileContents;
}

std::string readNWBFile(const std::string& nwbFileName) throw(std::exception) {
std::ifstream nwbFileStream(nwbFileName.c_str(), std::ifstream::in);

if (\!nwbFileStream.is_open()) {
        throw std::ios_base::failure("Unable to open NWB file for reading.");
    }

std::string nwbFileContents = readFileContents(nwbFileStream);
nwbFileStream.close();

return nwbFileContents;
}

std::string readPlatformFile(const std::string& platformFileName)
throw(std::exception) {
std::ifstream platformFileStream(platformFileName.c_str(),
std::ifstream::in);

if (\!platformFileStream.is_open()) {
        throw std::ios_base::failure(
            "Unable to open platform file for reading.");
    }

std::string platformFileContents = readFileContents(platformFileStream);
platformFileStream.close();

return platformFileContents;
}

std::string readFileContents(std::ifstream& inputFileStream) {
std::string fileContents;

while (inputFileStream.good()) {
        fileContents += inputFileStream.get();
    }

return fileContents;
}

void outputCombinedContentsToFile(const std::string& userFileContents,
const std::string& nwbFileContents,
const std::string& platformFileContents,
const std::string& fileName)
throw(std::exception) {
std::ofstream outputFileStream(fileName.c_str(), std::ofstream::out);

if (\!outputFileStream.is_open()) {
        throw std::ios_base::failure(
            "Unable to open output file for writing.");
    }

outputFileStream << "User file contents:" << std::endl;
outputFileStream << userFileContents << std::endl;

outputFileStream << "NWB file contents:" << std::endl;
outputFileStream << nwbFileContents << std::endl;

outputFileStream << "Platform:" << std::endl;
outputFileStream << platformFileContents << std::endl;
}