Introduction
In this tutorial we describe how to create a Java algorithm that takes advantage of the most common and useful CIShell algorithm development features. This includes information on how to handle data in your algorithm (input and output), as well as how to handle user-input parameters. We will do this by creating an algorithm to perform a simple transformation on a graph.
Prerequisites
You should understand the CIShell Basics. Make sure that Sci2 is installed and you have set your target platform in Eclipse as described in Setting Up the Development Environment. If you are not familiar with Sci2 development you should probably read Developing a Single Plugin and complete the Hello World tutorial.
Section Table of Contents
- Introduction
- Prerequisites
- Section Table of Contents
- Introduction
- Downloading the Jung Library Plugin and other Dependencies
- Setting up using the Java Algorithm Wizard
- The Algorithm class
- Importing packages for Java CIShell algorithms
- Handling input data in CIShell Algorithms
- Optional: Creating user-input parameters GUIs at runtime
Introduction
In this tutorial we will create an algorithm to test the "Attack Tolerance" of a network (deleting high degree nodes), as an example of a simple algorithm which has data input and output, and utilitizes user-input parameters. Testing Attack Tolerance is done by removing a certain number of the nodes with the highest degree (nodes with the most edges). If the network is relatively unfractured after the application of this algorithm, it can be said to have a high attack tolerance. To help us in this analysis, we will be using the JUNG graph library.
Downloading the Jung Library Plugin and other Dependencies
The Jung Library is a graph data library, which is used internally in CIShell as well as in certain CIShell tool algorithms. As part of developing our algorithm for this guide, we will be downloading the Jung library plugin and the other plugins it requires from the CIShell repository. Alternatively, you may generate these plugins on your own using the techniques described in Integrating 3rd-Party Libraries.
Whether you are building a plugin for an existing CIShell tool or creating a new tool, it will be useful to have read access to the CIShell repository. A guide to configuring Eclipse for CIShell repository access can be found here. (It shouldn't be too complicated. It only involves downloading a plugin which allows Eclipse to access Github repositories, and then connecting to the CIShell repository).
Once you have downloaded and configured a Git plugin as described in the document linked above, do the following:
- Switch to the SVN Repository Exploring perspective in Eclipse by clicking
Window -> Open Perspective -> Other... -> SVN Repository Exploring. - Follow the "Maven Integration for Eclipse (a.k.a. m2eclipse or m2e)" instructions here after forking a copy of the CIShell Git. This will give you access to all necessary plugins for these tutorials.
We have now checked out the Jung library plugin. If you switch back to the Java perspective, you will notice that the plugin is in your Eclipse workspace. If you open the MANIFEST.MF file of this plugin, you'll notice that it is exporting a variety of packages from the Jung java library. The plugin we are about to create will import some of these packages.
We are not done yet though, since the Jung plugin requires two other plugins of its own: cern.colt, and org.apache.commons.collections. Check these two plugins out from the libs/ directory of the CIShell repository just like we did with the Jung plugin. Fortunately for us, these two plugins have no dependencies of their own, so we should now have all the plugins we need to write our own (plugin projects will show red X icons on their project folders if anything is wrong).
Setting up using the Java Algorithm Wizard
For this tutorial we will be creating a new plugin using the CIShell Java Algorithm Wizard. The steps to produce the algorithm are much the same as in the Hello World tutorial, except that for the in_data and out_data page we will be specified real input and output instead of using null, and we will add a parameter to the algorithm's user-input parameters GUI.
To start the Java Algorithm Wizard, go to File-> New -> Project... in Eclipse, and select Java Algorithm Wizard from the CIShell folder.
The first few pages are much the same as they were in the Hello World tutorial. For this tutorial, we'll presume that you're using the default values for the first few pages (up until the second Algorithm Properties page), with the following exceptions:
Project Properties Page: Name your project org.my.attacktolerance.
Bundle Properties Page: Set your Bundle Name to Attack Tolerance. Set your Bundle Symbolic Name to org.my.attacktolerance.
Algorithm Properties Page 1: Set your Algorithm Name to Attack Tolerance. Set your Algorithm Class name to AttackToleranceAlgorithm. Set your Algorithm Package to org.my.attacktolerance.
On the second Algorithm Properties page we'll be doing something new, which requires a bit of explanation. in_data for a CIShell algorithm can be either files or Java objects. in_data for files is in the form of a MIME type, like "file:text/nwb" for the Network Workbench network format. in_data for Java objects is the class name of the object, such as prefuse.data.Graph for the prefuse Graph object. For this tutorial we will be using the data type edu.uci.ics.jung.graph.Graph, which is the full class name for the Graph object in the Jung graph library. You should also check the checkbox for On the menu, and set the menu path to be Analysis.
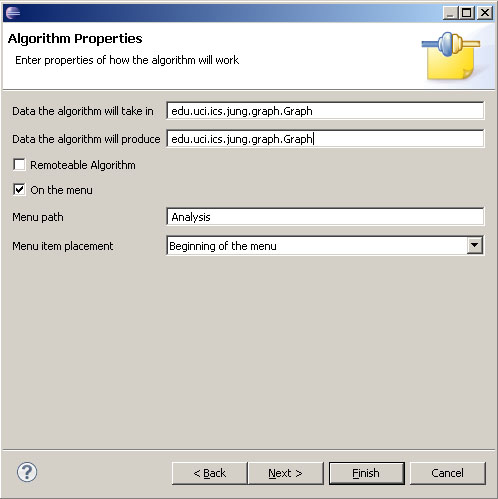
Figure 1: Setting the input and output data type.
To make our Attack Tolerance algorithm more flexible, we would like to allow our users to choose how many of the highest degree nodes they wish to remove. On the Algorithm Parameters page, click Add.... Set the following:
- Unique ID =
numNodesToDelete - Name =
Number of Nodes to Delete - Description =
The number of highest degree nodes to delete from the input graph - Default Value =
1 - Input Type =
Integer
Click OK to finish adding this parameter. This will create a field in the user-input parameters GUI which will appear whenever a user runs our Attack Tolerance algorithm. Later we'll show you how to access these values from the AttackToleranceAlgorithm class.
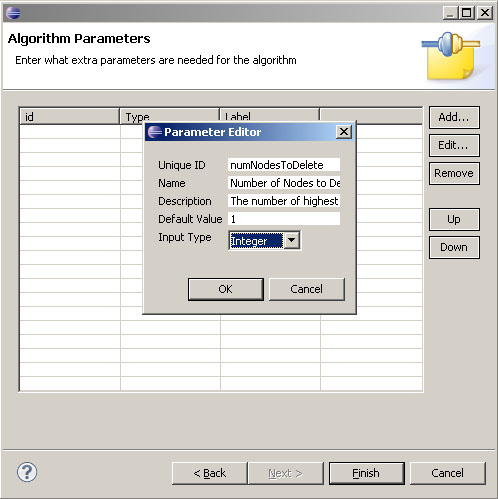
Figure 2: Setting the algorithm parameters to allow user interaction.
Now we have finished creating the supporting files for our plugin, and are ready to begin writing code.
The Algorithm class
Your AttackToleranceAlgorithm.java file should initially look like this:
package org.my.attacktolerance;

import java.util.Dictionary;
import org.cishell.framework.CIShellContext;
import org.cishell.framework.algorithm.Algorithm;
import org.cishell.framework.algorithm.AlgorithmExecutionException;
import org.cishell.framework.data.Data;

public class AttackToleranceAlgorithm implements Algorithm {
private Data[] data;
private Dictionary parameters;
private CIShellContext context;

public AttackToleranceAlgorithm(Data[] data, Dictionary parameters, CIShellContext context) {
        this.data = data;
        this.parameters = parameters;
        this.context = context;
    }

public Data[] execute() throws AlgorithmExecutionException {
    	return null;
    }
}
There are a few noteworthy things going on here. You will notice that the AttackToleranceAlgorithm class has a constructor, which accepts all the objects it needs to perform its task. The Data[] object contains an array of input data from the CIShell Data Manager, which the user has chosen to perform this algorithm on. In the case of our algorithm, the data array will contain zero element: a Jung Graph, because this is what we specified in our in_data property. The parameters Dictionary contains input values from the user-input parameters GUI, which is always shown to users before an algorithm is run. The CIShellContext allows the algorithm to access various services from the CIShell environment. See the CIShell Specification for information on the various services that are accessible through the CIShellContext.
Importing packages for Java CIShell algorithms
Because we specified the Jung graph as the in_data type, CIShell will arrange for us to be given a Jung graph object when this algorithm is run (if a network in the Data Manager is of some other type, CIShell's conversion service will convert that network to a Jung graph). The input objects are held in the data array that is passed as a constructor to the algorithm. We use the following code to access the Jung graph in this array.
	public Data[] execute() throws AlgorithmExecutionException {
        Graph graph = (Graph)(data[0].getData());
    	return null;
    }
OSGi/CIShell does not handle imports like normal Java programs do. In OSGi, each plugin has a separate class loader, and must explicitly declare which packages it wants to use.
To make the JUNG packages available to our plugin, double-click on META-INF/MANIFEST.MF in your attacktolerance plugin, and click the Dependencies tab at the bottom of the Manifest's window. You should see something like this:
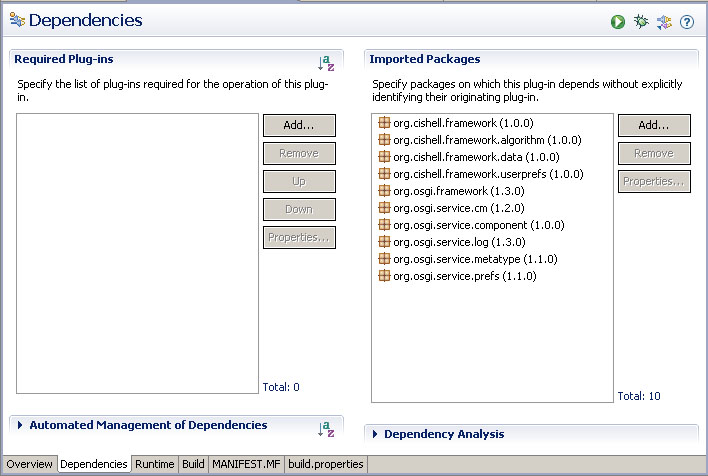
Figure 3: Manifest dependencies.
Notice that under "Imported Packages" several packages are already listed. The CIShell algorithm wizard automatically imports several core CIShell packages.
To import the Jung packages, click Add.... A dialog box that looks like this should appear:
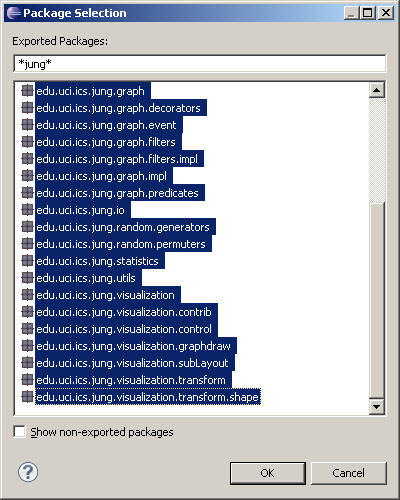
Figure 4: Importing the Jung packages.
To find all packages with the word "jung" in your workspace, type "jung" in the Export Packages: field. All the JUNG packages exported from the plugin we downloaded earlier should now be shown. To select all the packages, click the top-most package, then hold down the Shift key and select the bottom-most package (This should highlight all of the packages). Click OK to finish our selection.
To see the result of this operation, click the MANIFEST.MF tab at the bottom of the Manifest's window. You should see something like this:
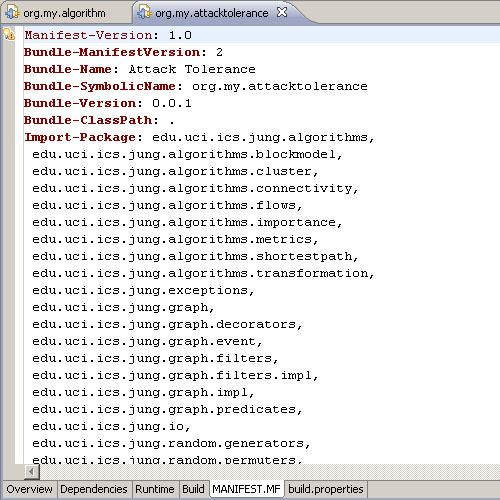
Figure 5: The MANIFEST.MF file.
The packages we have added now appear as part of the "Import-Package" attribute. It is possible to edit this file directly, but it is easier and safer to use the automatic method, as we just did.
Returning to the AttackToleranceAlgorithm, we should now be able to import the edu.uci.ics.jung.graph.Graph class with no errors. (Eclipse Tip: Write the Java code which requires some import, then press Control-Shift-O, and let Eclipse handle the imports for you. Be careful. Organizing missing imports will remove them from your code. This could cause some confusion.)
Handling input data in CIShell Algorithms
Now that we have the graph object, we can perform any analysis or operation we like on it. If you intend to modify the object though, it is important to first make a copy of that object and then modify the copy. This ensures that users will still be able to operate on the original input graph as well as the graph which results from running this algorithm.
To copy the graph object, we use the following code:
Graph attackGraph = (Graph) graph.copy();
Before we begin our analysis, there is one last thing we need to do. We must get the value specified by the user for how many of the highest degree nodes we should remove. These values are stored in the "parameters" Dictionary object. The keys in this dictionary are the "id" values we chose when designing the GUI in the wizard, and the values of this Dictionary are the values the user supplies when presented with the GUI we designed. If you don't recall the id or the type we gave to our parameter, you can look in the /OSGi-INF/metatype/METADATA.XML file. This file is the result of the parameters step in the wizard. (For more information about this file, see OSGi Compendium 'Metatype Service Specification' Section 105.
The following line is used to extract the number of nodes we should delete, "numNodesToDelete" from the Dictionary.
int numNodesToDelete = ((Integer) parameters.get("numNodesToDelete")).intValue();
Now we have obtain everything we need to do the attack tolerance analysis. Since the specifics of this algorithm are not important to learning about CIShell, we have provided the core code in the class below:
package org.my.attacktolerance;

import java.util.Iterator;
import edu.uci.ics.jung.algorithms.importance.DegreeDistributionRanker;
import edu.uci.ics.jung.algorithms.importance.NodeRanking;
import edu.uci.ics.jung.graph.Graph;
import edu.uci.ics.jung.graph.Vertex;

public class AttackTolerance {

/*\*
* Perform an attack tolerance test on the graph.
\*
* @return a Graph with 'numNodesToDelete' of its highest degree nodes deleted.
* Edges associated with deleted nodes will be removed as well.
\*/
	public static Graph testAttackTolerance(final Graph graph, int numNodesToDelete) {
		Graph graphToAttack = (Graph) graph.copy();
		DegreeDistributionRanker rankByDegree = new  DegreeDistributionRanker(graphToAttack);
		rankByDegree.evaluate();

		Iterator nodesByDegree = rankByDegree.getRankings().iterator();
		for (int numNodesDeleted = 0;
	      numNodesDeleted < numNodesToDelete && nodesByDegree.hasNext();
		  numNodesDeleted++) {
			Vertex v = ((NodeRanking) nodesByDegree.next()).vertex;
			graphToAttack.removeVertex(v);
		}
		return graphToAttack;
	}
}
Here we've created a third class, AttackTolerance, which will be used by AttackToleranceAlgorithm. It is a good practice to separate the CIShell Algorithm code from the domain-specific analysis code for reasons of modularity. You can have as many additional classes or packages as you like in a plugin, and can also share classes between plugins by importing and exporting packages through a plugin's manifest, as we saw in previous sections with the Jung library.
Now that we've fleshed out the code for our analysis, we must alter our AttackToleranceAlgorithm to use this new class, and we must return the result of our analysis to CIShell in the form of a Data object.
Below is the updated code for AttackToleranceAlgorithm.java, which now utilizes the AttackTolerance class, and returns the modified graph as Data:
package org.my.attacktolerance;

import java.util.Dictionary;
import org.cishell.framework.CIShellContext;
import org.cishell.framework.algorithm.Algorithm;
import org.cishell.framework.data.BasicData;
import org.cishell.framework.data.Data;
import org.cishell.framework.data.DataProperty;

import edu.uci.ics.jung.graph.Graph;

public class AttackToleranceAlgorithm implements Algorithm {
	private Data\[\] data;
	private int numNodesToDelete;

	public AttackToleranceAlgorithm(Data\[\] data, Dictionary parameters, CIShellContext context) {
		this.data = data;
		this.numNodesToDelete = ((Integer) parameters.get("numNodesToDelete")).intValue();
	}

	public Data\[\] execute() {
		Graph inputGraph = (Graph) (data[0].getData());
		Graph outputGraph = AttackTolerance.testAttackTolerance(inputGraph, numNodesToDelete);
		Data outputData = prepareOutputData(outputGraph);
		return new Data\[\] { outputData };
	}

	private Data prepareOutputData(Graph outputGraph) {
		Data outputData = new BasicData(outputGraph, Graph.class.getName());
		Dictionary metadata = outputData.getMetadata();
		metadata.put(DataProperty.PARENT, data[0]);
		metadata.put(DataProperty.TYPE, DataProperty.NETWORK_TYPE);
		metadata.put(DataProperty.LABEL, "High Degree Node Deletion (Attack Tolerance)");
		return outputData;
	}
}
The important part of this code is the prepareOutputData() method, specifically the metadata of the Data object. When returning data to CIShell, we must set certain metadata on the data to tell CIShell various things about the data, such as its type (NETWORK_TYPE, in the case, which is primarily used by the Data Manager to give the data the appropriate icon for a network), label, which is used as the name of the data in the Data Manager, and parent, which is used to specify which data item this file should be a child of in the data manager. All of the possible Data properties are documented in the CIShell Specification.
When we construct our outputData object, we provide two arguments to the BasicData constructor: the outputGraph itself, and also the type of the output graph. This type should match the out_data type of the algorithm (in this case, our output type was the same as our input type : a JUNG graph, but it is perfectly acceptable to produce output of a different type from your input. See Making Converters and Validators).
The algorithm is now complete. To see the algorithm in action, export it into the Network Workbench tool. Load a network file from the /sampledata/ directory, select it in the Data Manager, and run our algorithm from the Analysis menu. You should be able to visualize the network both before and after our algorithm using the GUESS tool in the Network Workbench visualization menu.
Congratulations! You have now created a real working CIShell algorithm.
Optional: Creating user-input parameters GUIs at runtime
Sometimes it is useful to modify the user-parameters GUI based on the data it is operating on. For instance, if you wanted to let a user choose which column of a table to perform some operation on, you would need to populate a drop-down box with the columns present in that table.
In the case of our attack tolerance algorithm, maybe we would like to recommend how many highest-degree-nodes should be removed from the network, based on the total number of nodes.
To do this, we must modify the AttackToleranceAlgorithmFactory. Our AlgorithmFactory must implement the ParameterMutator interface, which includes only a single method:
public ObjectClassDefinition mutateParameters(Data[] data, ObjectClassDefinition parameters)
The Data[] array is the data which the algorithm will be operating on, and the parameters object is an object representation of the pre-mutated GUI (the one we defined in our wizard, and which is defined in file form in METADATA.XML). In order to fully understand the parameters object, you will need to read OSGi Compendium 'Metatype Service Specification' Section 105, and The CIShell Specification, 'MetaTypeProvider Extensions', Section 2.5.2. For now it should suffice to provide the relevant source code, and briefly describe its operation.
Source code for AttackToleranceAlgorithmFactory.java as a ParameterMutator:
package org.my.attacktolerance;

import java.util.Dictionary;
import org.cishell.framework.CIShellContext;
import org.cishell.framework.algorithm.Algorithm;
import org.cishell.framework.algorithm.AlgorithmFactory;
import org.cishell.framework.algorithm.ParameterMutator;
import org.cishell.framework.data.Data;
import org.cishell.reference.service.metatype.BasicAttributeDefinition;
import org.cishell.reference.service.metatype.BasicObjectClassDefinition;
import org.osgi.service.metatype.AttributeDefinition;
import org.osgi.service.metatype.ObjectClassDefinition;

import edu.uci.ics.jung.graph.Graph;

public class AttackToleranceAlgorithmFactory implements AlgorithmFactory, ParameterMutator {
	public Algorithm createAlgorithm(Data\[\] data, Dictionary parameters, CIShellContext context) {
        return new AttackToleranceAlgorithm(data, parameters, context);
    }

	public static final int DELETE_ONE_IN_N_NODES_BY_DEFAULT = 10;

	/\*
	* set the default value for 'Number of Highest Degree Nodes to Delete'
	* to 1/Nth of the total number of nodes in the graph.
	\*/
	public ObjectClassDefinition mutateParameters(Data\[\] data, ObjectClassDefinition parameters) {
		//calculate how many nodes to delete by default
		Graph inputGraph = (Graph) data[0].getData();
		int defaultNumNodesToDelete = calculateDefaultNumNodesToDelete(inputGraph);
		BasicObjectClassDefinition newParameters = new BasicObjectClassDefinition(
		parameters.getID(),
		parameters.getName(),
		parameters.getDescription(), null);


		//for each attribute definition in the original attribute parameters
		AttributeDefinition\[\] paramAttributes =
		parameters.getAttributeDefinitions(ObjectClassDefinition.ALL);
		for (int ii = 0; ii < paramAttributes.length; ii++) {
		AttributeDefinition paramAttribute = paramAttributes[ii];
		//if it is the numNodesToDelete attribute...
		if (paramAttribute.getID().equals("numNodesToDelete")) {
			/*
			 * add that attribute to our new set of attributes,
			 *  but with the new default value we calculated
			 */
			AttributeDefinition modifiedAttribute = new BasicAttributeDefinition(
				paramAttribute.getID(), paramAttribute.getName(),
				paramAttribute.getDescription(), paramAttribute.getType(),
				String.valueOf(defaultNumNodesToDelete));
			newParameters.addAttributeDefinition(
				ObjectClassDefinition.REQUIRED, modifiedAttribute);
		} else {
			//add any other attribute to our new set of attributes as-is.
			newParameters.addAttributeDefinition(
				ObjectClassDefinition.REQUIRED, paramAttributes[ii]);
		}
	}
	//return our new attribute parameters
	return newParameters;
}

private int calculateDefaultNumNodesToDelete(Graph graph) {
		int numNodesInGraph = graph.numVertices();
		int recommendedToDelete = Math.max(numNodesInGraph / DELETE_ONE_IN_N_NODES_BY_DEFAULT, 1);
		return recommendedToDelete;
	}
}
For this code to compile, you will need to import the package org.cishell.reference.service.metatype in the project's manifest.
The basic pattern is to create a new ObjectClassDefinition (the object that describes the GUI, and is based on the METADATA.XML file) based on the old ObjectClassDefinition, with some minor modifications. Here, we copy over all the parameters from the original, except we set the default value of our numNodesToDelete attribute definition to be roughly one-tenth the number of nodes in the entire graph. (Technically, since we only have one parameter, we don't need to iterate through the parameters like a list, but doing it like this will make our mutateParameters method flexible in case we decide to add more parameters at a later date).