Introduction
This guide describes how to create a simple "Hello World" Java Algorithm using CIShell's Algorithm Development wizard in Eclipse.
Video Overview
For quick reference, please view this video overview of creating a basic CIShell/Sci2 plugin development environment:
CIShell Hello World Plugin Overview
Prerequisites
You will want to be familiar with the basics of Java CIShell Algorithms described in CIShell Basics. Be sure your development environment is set up as described in Setting Up the Development Environment.
It may be helpful to have the CIShell Specification available to you for reference purposes.
Section Table of Contents
Downloading and Installing CIShell
The first thing you'll need to do is download the latest release of CIShell. We recommend doing that from the nightly build repository, located at http://cishell.org/nightly/. You'll probably want to download the latest build, which should be at the bottom of the page with the current date in the directory name. For example, for tonight's nightly build (9/19/2013), the directory name was 2.0.0.201309190007NGT/. Within that directory, you'll want to select the archive file that corresponds with your operating system and computer architecture (32 or 64 bit).
Once you download the archive file, extract the files in it to a directory. Then, go into the directory and look for an application "cishell". On Windows, you'll want to create a shortcut to that file, then right click that shortcut and go to Properties. At the end of the Target field, you'll want to add " -console -clean". These flags will start CIShell with a developer console, and clean the cache every time it loads so that new plugins are more easily detected. Here is an example of the target line for my particular PC:
C:\Users\username\Downloads\cishell-N-2.0.0.201309190007NGT-win32.win32.x86\cishell.exe -console -clean
Creating an Algorithm
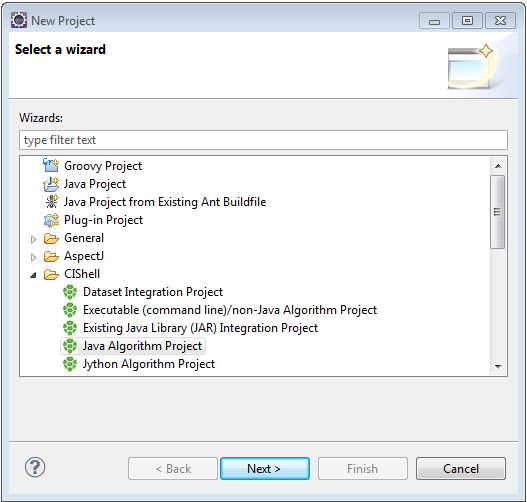
Creating a CIShell Algorithm is a simple process with our CIShell Algorithm Development wizards. To create a CIShell Java Algorithm Project, go to File -> New -> Project... and expand the CIShell group of wizards.

Figure 1: Available CIShell Algorithm Projects.
Select Java Algorithm Project and press Next >. On the next screen, fill in a project name and press Next >. As a convention, we usually make the project name, package name, and symbolic name identical for CIShellplugins, as you will see in the following steps.
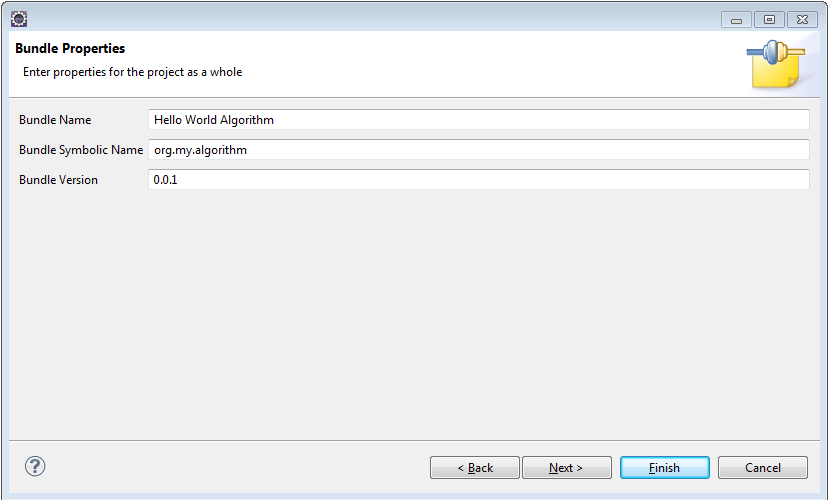
The next page, Bundle Properties, requires input about your algorithm bundle. The Bundle Name (Bundle-Name) is a name for your algorithm bundle as a whole, which can just be the name of the algorithm. The Bundle Symbolic Name (Bundle-SymbolicName) is the name CIShell will use to refer to this plugin internally. The Bundle Version (Bundle-Version) should be the version number of your algorithm. Use the default values, and click Next > to go to the Algorithm Properties page.

Figure 2: Bundle Properties.
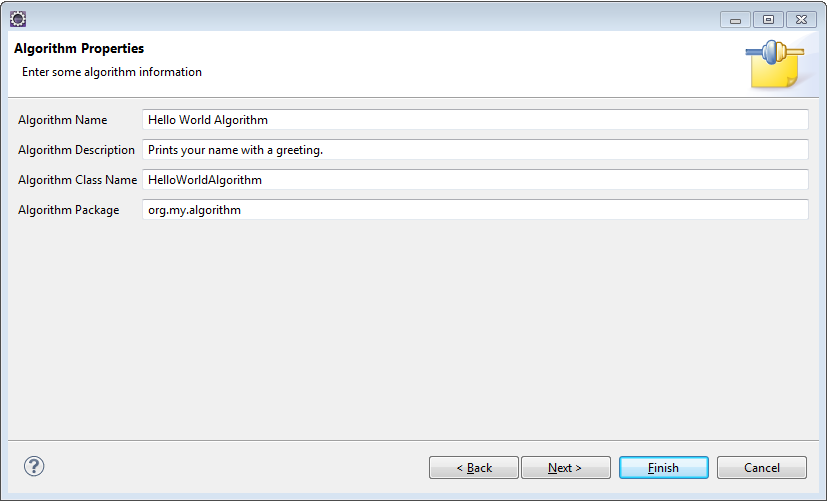
The Algorithm Properties page requires input about your algorithm. Algorithm Name (label) is the name of your algorithm as it will appear in a CIShell application's menu. Algorithm Description (description) will be used as documentation to describe what your algorithm does in CIShell. Algorithm Class Name will be the name of the Java Algorithm class generated. It is conventional to have all algorithm classes end with "Algorithm" in CIShell. Algorithm Package will be the Java package of the Algorithm class that will be generated. This should be the same as the project name.
Change the Algorithm Name to Hello World, the Algorithm Description to Prints 'Hello World!' to the Console, and the Algorithm Class Name to HelloWorldAlgorithm. The package can stay as org.my.algorithm. Click Next > to go to the second Algorithm Properties page.

Figure 3: Algorithm Properties.
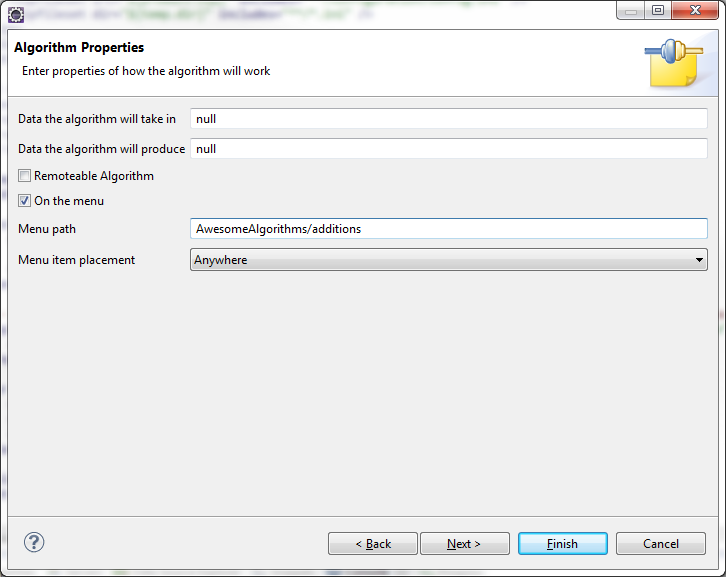
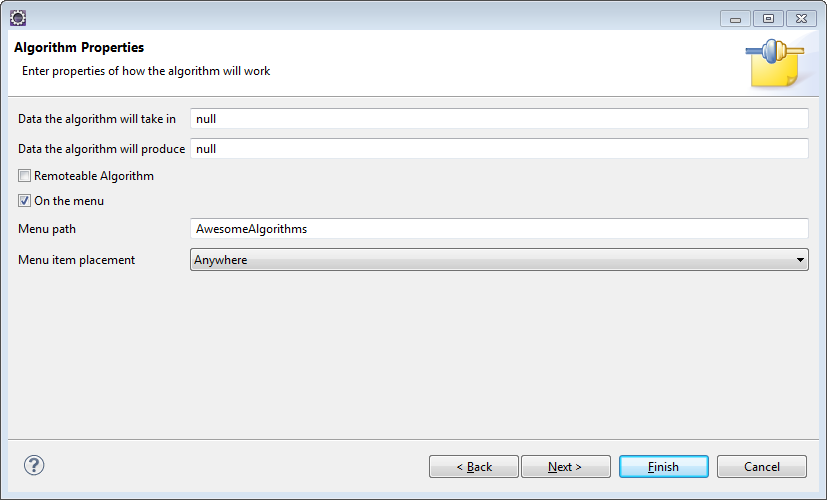
The second Algorithm Properties page requires input about how the algorithm will work. Data the algorithm will take in (in_data) says what data the algorithm will take in (if any) to process. Data the algorithm will produce (out_data) says what data the algorithm will return if any. If your algorithm will not be creating its own GUI (i.e., visualizations) and meets the requirements for a remoteable algorithm, check Remoteable Algorithm (remoteable). If your algorithm should be visible on a CIShell application's menu bar, check On the menu and fill in Menu path and Menu item placement (menu_path). This says where to place the algorithm on the menu. It is a '/' separated path, that also says where on the specific submenu to place the algorithm. See the OSGispecification for more details.
For this tutorial we should set both data taken in and data produced to null. Check the On the menu checkbox, and set the Menu path to AwesomeAlgorithms/additions. Because of a documented issue with CIShell, the menu path always has to end in "/additions" for the plugin to show up on the CIShell menu bar. When you boot up CIShell, it should appear next to File, Tools, etc, as "AwesomeAlgorithms".
When you are finished, click Next > to go to the Algorithm Parameters page.

Figure 4: More Algorithm Properties.
The next page allows you to specify what additional input parameters are needed from the user. You can use the Add button to add as many extra inputs as needed. There are many different types of inputs including strings, numbers, files, and directories. When the algorithm is run, this information is used to create a GUI for the user to input responses. The Unique ID field for each input parameter will be used as a key to obtaining the values provided by the user (please make sure the IDs are unique). The Name field will label each input parameter on the GUI. The Description field will become the help text associated with each input parameter.
Select Add button to add a algorithm parameter and insert the following values into the input fields.
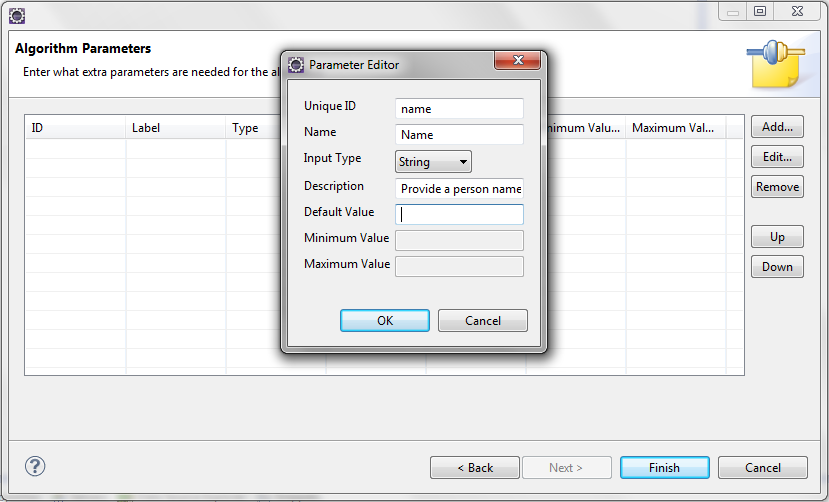
Figure 5: Algorithm Input Parameters.
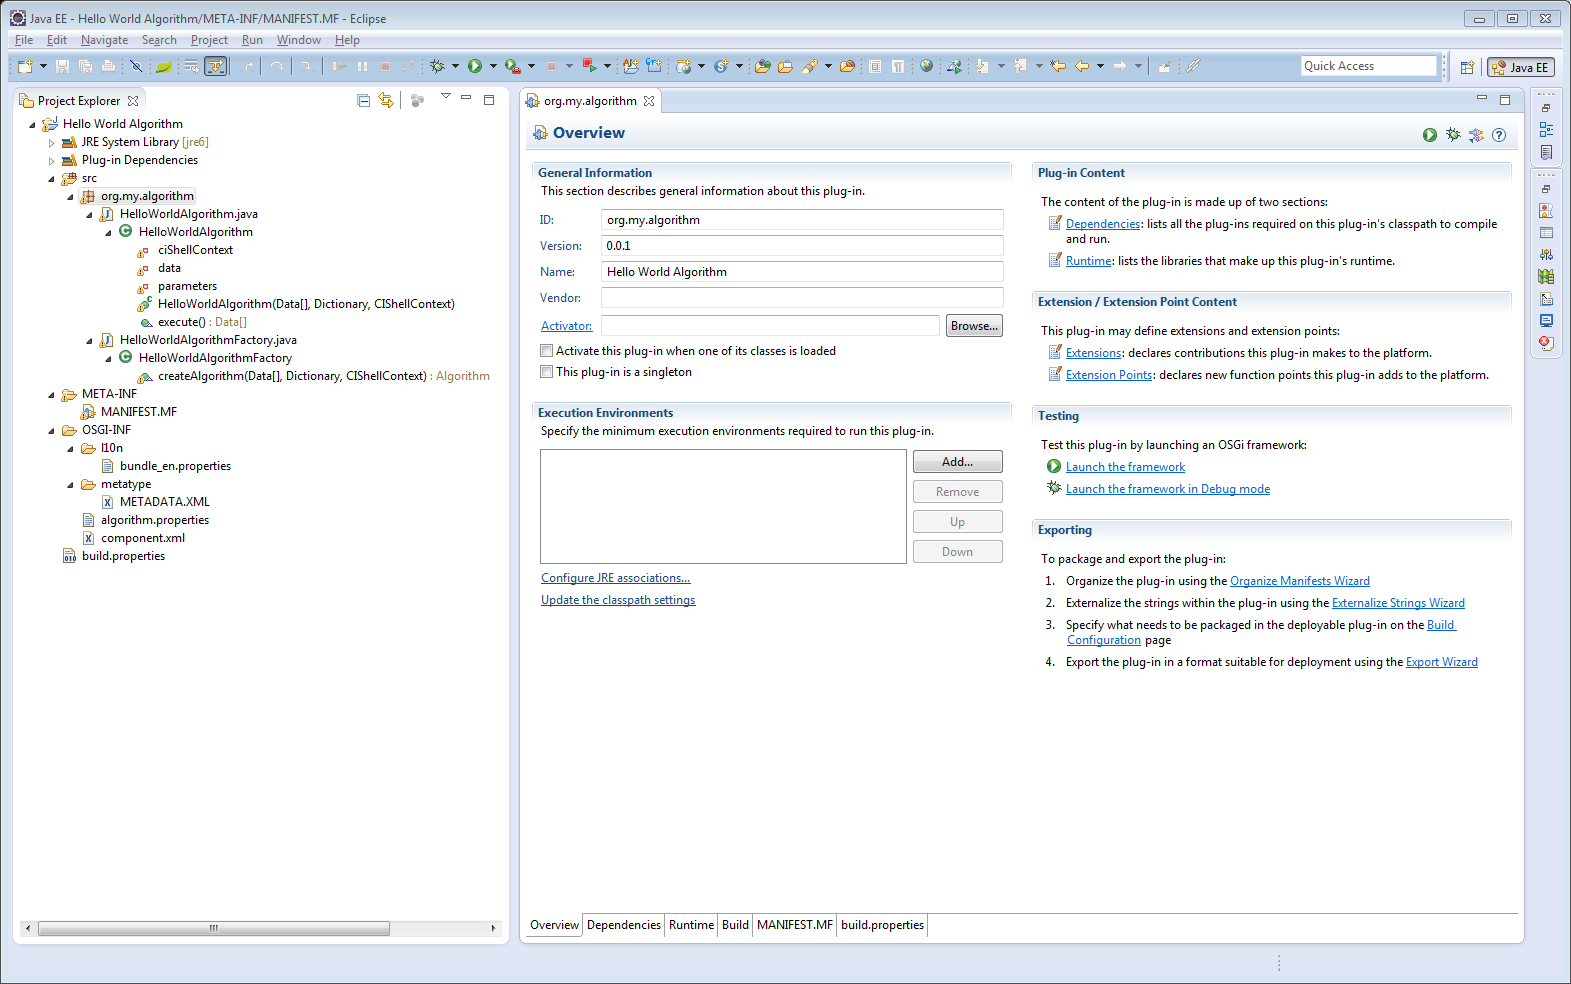
Finally, press the Finish button to generate a new Java Algorithm project. This is what should appear in Eclipse:

Figure 6: Resulting Java Algorithm project.
Several files are generated for the project:
- Two Java classes are generated, an Algorithm class and its associated AlgorithmFactory class.
- A MANIFEST.MF containing the Algorithm's bundle properties.
- A bundle_en.properties file for internationalization.
- A METADATA.XML file holding the Algorithm's user-entered input parameters (see OSGi Compendium 'Metatype Service Specification' Section 105
- An algorithm.properties file holding the algorithm's properties (see CIShell Specification 'Service Metadata' Section 2.3.3).
- A component.xml file which registers the algorithm to OSGi's Service Registry (see OSGi Compendium 'Declarative Services Specification' Section 112).
- A build.properties file which enumerates what files/directories are to be included when creating an OSGibundle from the project.
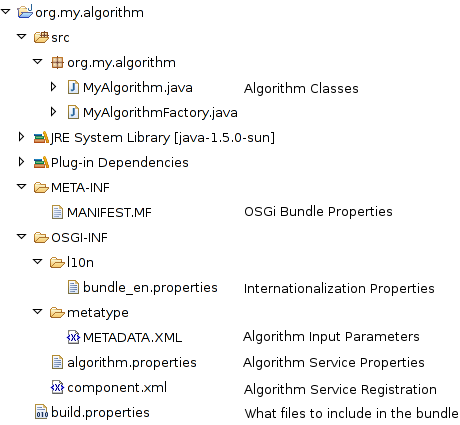
Figure 7: Files in the Algorithm project.
Writing the Java code for the Algorithm
You should now see an open project with the name org.my.algorithm in your Eclipse workspace. If you open the src folder in this project, you should see the package org.my.algorithm, which we created in the wizard. Expanding this package, you should see two classes: HelloWorldAlgorithm.java, and HelloWorldAlgorithmFactory.java. These two files are the basis of almost all Java algorithms in CIShell.
Algorithms in CIShell almost always have their own factory class, which helps to create the algorithm. Opening HelloWorldAlgorithmFactory, you can see that the algorithm factory has a createAlgorithm method, which creates and returns the HelloWorldAlgorithm object. Sometimes you will need to modify the AlgorithmFactory, but for this simple tutorial it does not need modification, so we can go straight to modifying the HelloWorldAlgorithm file itself.
The contents of HelloWorldAlgorithm.java should look like this:
package org.my.algorithm;

import java.util.Dictionary;
import org.cishell.framework.CIShellContext;
import org.cishell.framework.algorithm.Algorithm;
import org.cishell.framework.algorithm.AlgorithmExecutionException;
import org.cishell.framework.data.Data;

public class HelloWorldAlgorithm implements Algorithm {
    private Data[] data;
    private Dictionary parameters;
    private CIShellContext context;

    public HelloWorldAlgorithm(Data[] data, Dictionary parameters, CIShellContext context) {
        this.data = data;
        this.parameters = parameters;
        this.context = context;
    }

    public Data[] execute() throws AlgorithmExecutionException {
    	return null;
    }
}
In its current state this algorithm will run perfectly well in a CIShell tool, but we need to add a few lines to make it do something.
In order to print our "Hello World!" message to the console, we must get the LogService from the CIShellContext.
The full code for our simple Hello World algorithm is as follows:
package org.my.algorithm;

import java.util.Dictionary;
import org.cishell.framework.CIShellContext;
import org.cishell.framework.algorithm.Algorithm;
import org.cishell.framework.algorithm.AlgorithmExecutionException;
import org.cishell.framework.data.Data;
import org.osgi.service.log.LogService;

public class HelloWorldAlgorithm implements Algorithm {
	private Data[] data;
	private Dictionary parameters;
	private CIShellContext ciShellContext;
	private LogService logger;

	public HelloWorldAlgorithm(Data[] data,
	  Dictionary parameters,
	  CIShellContext ciShellContext) {
		this.data = data;
		this.parameters = parameters;
		this.ciShellContext = ciShellContext;
		this.logger = (LogService) ciShellContext.getService(LogService.class.getName());
	}


	public Data[] execute() throws AlgorithmExecutionException {
		String name = (String) parameters.get("name");
		this.logger.log(LogService.LOG_INFO, "Hello World!\n Welcome " + name);
		this.logger.log(LogService.LOG_WARNING, "Warning msg");
		this.logger.log(LogService.LOG_ERROR, "Error msg");
		this.logger.log(LogService.LOG_DEBUG, "Debug msg");
		return null;
	}
}
In the constructor we obtain the LogService by passing its class name to the getService method of the CIShellContext. CIShell guarantees that the LogService and several other services will always be available using this technique. For more information see the CIShell Specification.
Once we have obtained the LogService in the constructor, we are able to print our "Hello World!" message in the execute() method.(Incidentally, the constructor should not be used to perform the main work of the algorithm, as only the execute method is guaranteed to be called at the appropriate time. An algorithm may theoretically be constructed and held for a long period of time, but only executed much later).
The first argument, LogService.LOG_INFO, ensures that the message is only meant to be informative, in contrast with LogService.WARNING, which is used for non-fatal errors. Fatal errors (errors which cannot be recovered from) should be thrown as AlgorithmExecutionExceptions.
(It is also possible to simply use System.out.println("Hello World!") to print a message from a CIShell algorithm, but this message will be routed to the OSGi console instead of the standard user-visible CIShell console. To see the OSGi console, which can be useful for debugging purposes, start your CIShell tool as described in Accessing the OSGi Console).
Our "Hello World!" CIShell Algorithm is now complete.
Exporting an Algorithm for Use
To test the Algorithm, right click on the project name and click Export. In the new dialog expand the Plug-in Development category and select Deployable plug-ins and fragments, then click Next >.
On the next page, check the algorithm bundle to export as an OSGi Bundle and set the destination directory to be where a CIShell application is installed. Do not export to the /plugins directory of a CIShell tool directly, even though this is the final destination of the plugin, as this will cause your plugin to be exporting to a plugins directory within the real plugins directory (Eclipse appends /plugins to the path of whichever directory you choose). Click Finish to export the algorithm bundle.
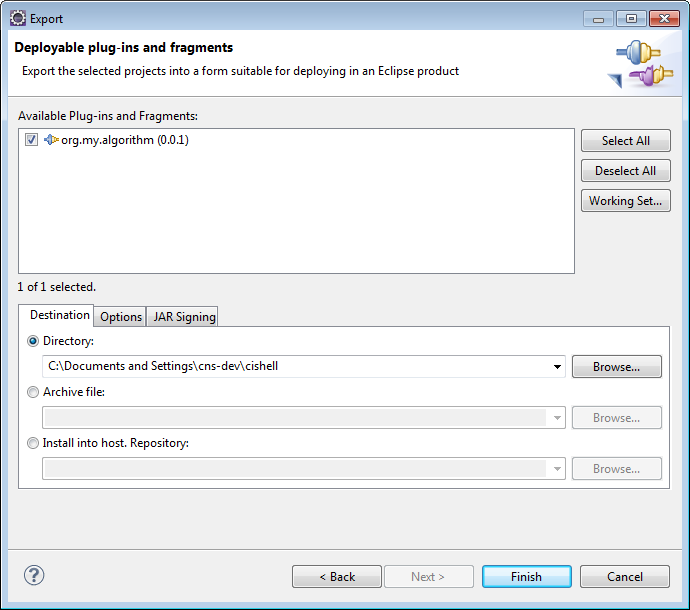
Figure 8: Algorithm Export.
We should now be able to run the CIShell application and test the Algorithm. To see your algorithm in action, start your CIShell tool, and choose the algorithm from the menu "AwesomeAlgorithms" which should appear along the top menu bar. The message "Hello World!" message, the error message and the warning message should be printed in the CIShell Console.
The debug message is not showed in the CIShell console. To view the debug message, you will need to open the OSGI console. See the Debugging Tips for this purpose.
Debugging Tips
If something goes wrong, and there is no obvious error message, first make sure that your plugin can be found in the CIShell tool's /plugins directory. If the plugin is present, try starting CIShell with the OSGi console, as described in Accessing the OSGi console, and type "ss". This will list all the algorithms installed in your CIShell tool. Find the id associated with that plugin, and try typing "start ID" where ID is the number (say, 129). If OSGi had some error while trying to start your plugin, attempting to restart it in this way should cause the error to be printed to the OSGi console.
If you need to export your plugin again, and have changed any properties, please run the CIShell application with the -clean command-line switch (See Accessing the OSGi console in CIShell tools.
Next Steps
Now that you've completed your first plugin, try developing a plugin to manipulate tabular data.