Introduction
This document will walk you through installing Eclipse, installing and configuring necessary plugins, pulling all the necessary source code, and even building both CIShell and Sci2. This process is only necessary if you plan on doing advanced development on the CIShell platform or Sci2 core plugins. If you are developing or modifying a single plugin, refer to this tutorial instead. This tutorial will be presented in steps, and assumes you already have the most recent version of the Java 7 64-bit JDK installed.
Preparing Eclipse
Install and Launch Eclipse
The first thing you'll need to do is acquire Eclipse, if you don't already have it. The Eclipse.org website is the official source for these downloads. In this case, we will be installing the latest version, Eclipse Kepler. It is recommended to download the Eclipse Standard Package. If you have the Java 64-bit JDK, you will want to download the 64-bit version of Eclipse. Extract the contents of the .zip download, which should consist of a folder called eclipse. Place the folder wherever you would like, change the name if you wish, then open up eclipse.exe contained in the folder. Eclipse will ask you to select a workplace, so either accept the default location or select a custom directory. When Eclipse opens for the first time, you should see a welcome screen, which you can close.
Note:
Install and Configure Eclipse Plugins
EGit
EGit should be included in all Eclipse Standard packages. To double check, you can click on Help->About Eclipse from the Eclipse toolbar. EGit should be one of the plugins listed.
Subclipse
To install Subclipse, you'll want to go to Help->Install New Software... from the Eclipse toolbar.
- In the Work with: field, paste the following URL: http://subclipse.tigris.org/update_1.8.x
- Note: The newest version of Subclipse, such as 1.10.x, do not currently work with plugins we will install later on
Click on the
Add...button to the right of that fieldGive a descriptive name to this new repository, such as Subclipse
After fetching data from the repository, two top level results should appear. Check the boxes to the left of
SubclipseandSVNKitthen clickNextClick
Nextagain, accept the terms of the license agreement, then clickFinishEclipse will now install Subclipse. It may ask to be restarted - go ahead and agree to that so that the installation can complete
Maven Integration (m2eclipse)
To install m2eclipse, you'll want to go to Help->Install New Software... from the Eclipse toolbar.
- In the Work with: field, paste the following URL: http://download.eclipse.org/technology/m2e/releases
- Click on the
Add...button to the right of that field - Give a descriptive name to this new repository, such as
m2eclipse - After fetching data from the repository, a single top level result should appear. Check the box to the left of
Maven Integration for Eclipse, then clickNext - Click
Nextagain, accept the terms of the license agreement, then clickFinish - Eclipse will now install m2eclipse. It may ask to be restarted - go ahead and agree to that so that the installation can complete
Add m2eclipse Connectors
The Maven integration software requires two connectors for Git and Subversion before we can start pulling code and importing projects with Maven. We will now install those connectors.
egit Handler
- Go to
File->Import... from the Eclipse toolbar - Select
Maven->Check out Maven Projects from SCMand then clickNext - Near the bottom of this window, where it says
Find more SCM connectors in the m2e Marketplace, click the blue link - In the window that opens, in the Find: field, type in
egit. The first result should bem2e-egit- check the box next to that entry and clickFinish - After some processing, another window should pop up. The
Maven SCM Handlershould be checked, so you can just clickNexthere - Click
Nexton the following screen, then accept the license agreement and clickFinish - A security warning might pop up, just click
OK - A dialog will prompt you to restart Eclipse - click
Yes
Subclipse Handler
- Go to
File->Import... from the Eclipse toolbar - Select
Maven->Check out Maven Projects from SCMand then clickNext - Near the bottom of this window, where it says
Find more SCM connectors in the m2e Marketplace, click the blue link - In the window that opens, in the Find: field, type in
subclipse. The first result should bem2e-subclipse- check the box next to that entry and clickFinish - After some processing, another window should pop up. The
Maven SCM Handlershould be checked, so you can just clickNexthere - Click
Nexton the following screen, then accept the license agreement and clickFinish - A security warning might pop up, just click
OK - A dialog will prompt you to restart Eclipse - click
Yes
Note:
Please note, SVN and the SVN connector will not work until you make this change:
- After Eclipse has been restarted, go to
Window->Preferencesfrom the toolbar - In the search field in the top left corner, type in SVN, then click on the SVN header
- In this options screen, under SVN interface, select
SVNKit (Pure Java)for Client - Click
OKto exit Preferences and save changes
Ant-Contrib
In order to build programs like CIShell, additional build steps are sometimes required outside of the usual Maven build process. For these tasks, you'll need to use Ant. In this case, you will need to install the Ant-Contrib library to your local version of Ant.
- Download and unzip the latest version of Ant-Contrib. Ant-Contrib has not been updated since 2006, so it's a pretty safe bet that this download will be the most recent release: ant-contrib-1.0b3-bin.zip
- After unzipping, you'll want to move the jar file (ex:
ant-contrib-1.0b3.jar) to yourANT_INSTALLATION/lib/directory. In my case, this was located atplugins/org.apache.ant_<version>/libinside of my main Eclipse folder - Next, you need to add the new jar to Ant's classpath. To do this, go to
Window->Preferences->Ant->Runtime->Classpathin Eclipse. SelectAnt Home Entries, then clickAdd External JARs. Now navigate to the ant-contrib jar we imported and select it. A warning might pop up, but just clickYesif that happens. - Now click
OKto save your preferences, and Ant-Contrib should be ready to go
Pulling Code and Building
Once your Eclipse is fully configured, you can begin the process of pulling source code from the relevant Git and SVN repositories. Keep in mind that this is only necessary if you intend to do advanced development work on the CIShell or Sci2 core, or wish to build the projects in your local Eclipse instance. Additionally, these steps may vary between internal CNS developers and the general public.
CIShell
Pulling from the GitHub Repository
To pull and commit changes to the public GitHub repository, you will need a GitHub account. The specifics of SSH keys and configuring your GitHub are covered here, so we won't spend any time on that. If you want eventually commit changes and have them added to the main CIShell repository, you'll want to fork it and commit your changes there. Then you can submit a pull request to have your changes integrated to the production branch. For this walkthrough, I'll use my personal fork of CIShell, but the steps are generally the same for the main repository found here.
Keep in mind that this will pull the code for all the CIShell core modules and is not necessary for most developers. If you are interested in single plugin development, refer to this guide instead: Developing a Single Plugin
- Go to
File->Import...on the Eclipse toolbar - Select
Check out Maven Projects from SCM, then clickNext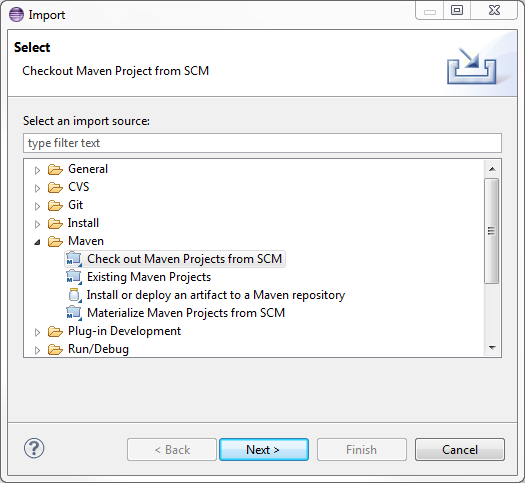
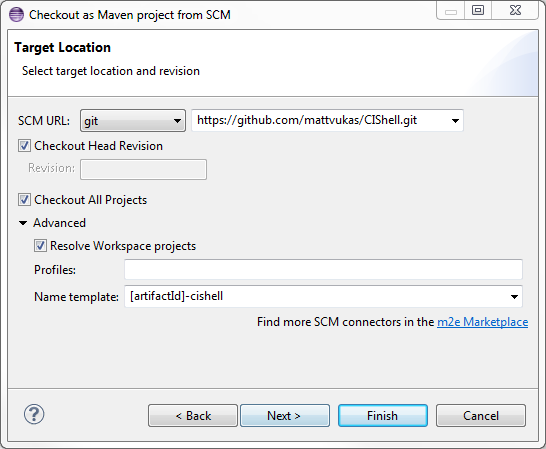
- For
SCM URL, selectgitfrom the drop down menu, then paste your Git URL to the right of that- Note: I used the https URL, instead of the ssh URL in this case, to avoid the hassle of setting up SSH keys. Either way should work
- Note: I used the https URL, instead of the ssh URL in this case, to avoid the hassle of setting up SSH keys. Either way should work
- Most developers prefer to append a name to all projects imported from a certain repo. You can do that using the
Name templatefield, as shown. Then clickNext - Leave this screen as is and click
Finish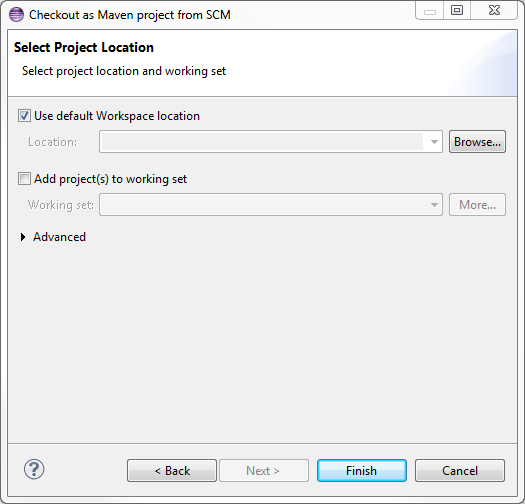
- A Maven project import screen may pop up. Just leave everything selected, then under
Advanced, you may have to reenter the sameName templateyou added on that previous step. Then clickNext.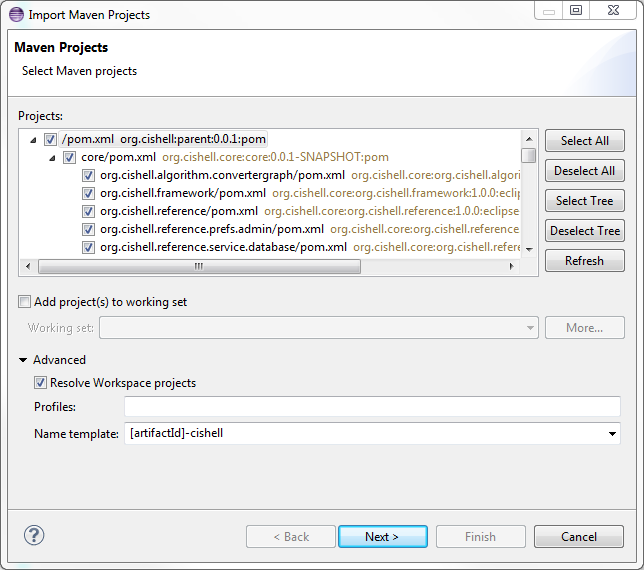
- On this next screen with all the green check marks, just click
Finish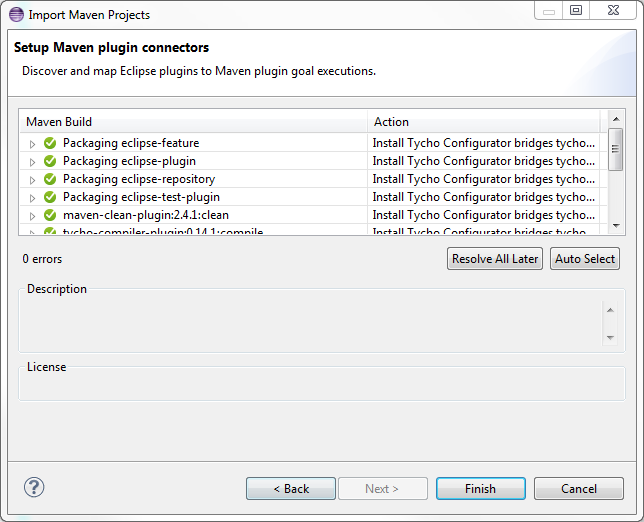
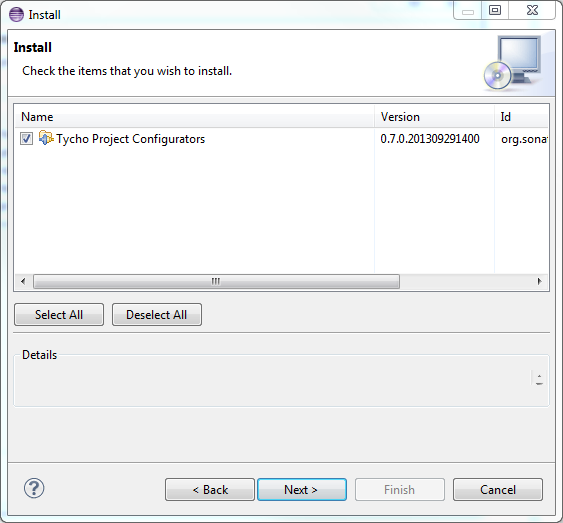
Tycho builds eclipse plugin with maven. So Eclipse will prompt to install 'Tycho Project Configurators' . Just click 'Next' though the dialogs and accept license agreement. After installation, it will prompt to restart. Click 'Yes'.
- At this point, Eclipse will pull in all the CIShell projects. Each project should now be managed by Maven and in sync with your Git repository, as shown by the symbols on each project
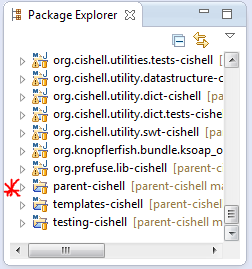
- The parent project is the top level CIShell project, which you can later use to build CIShell with
You now have everything you need to work on the CIShell core in your local development environment, or build CIShell completely.
Building with Maven and Ant
- Right click the parent CIShell project (named
parent-cishellin my example), then clickRun As->Maven build... - In the window that pops up, type
clean installinto theGoalsfield. This will perform a Maven clean, followed by a Maven install command - Click the
Runbutton. Maven will then go through the CIShell build process, which may take some time - After the Maven tasks have completed (you should see
BUILD SUCCESSin the console if this is the case), we need to perform the Ant tasks- In the parent project, go to
deployment/org.cishell.reference.releng/postMavenTasks.xml, right click on it, and go toRun As->Ant Build - You will probably see output of the Ant script in the Console, but it should eventually stop with a
BUILD SUCCESSFULmessage
- In the parent project, go to
Locating the Finished Build
- Inside of your Eclipse workspace directory, locate your parent CIShell directory, which in my case was named
parent-cishell - Inside of this folder, go to
deployment/org.cishell.reference.releng/target/products-final - In this folder, there should be several compressed folders, each for a different system type
- Locate the one for your particular system and extract it to a new directory
- Go inside of that new directory, right click on the CIShell application (
cishell.exe), and create a new shortcut. Right click on the shortcut and go toProperties. At the end of theTargetline, after a space, type "-clean -console". This will aid with adding new plugins and debugging. - Launch the shortcut to run CIShell
Sci2
Pulling from the NWB SVN Repository
To checkout and commit changes to the NWB SVN repo, you need to be a CNS developer with SSH access. If you only want to checkout the code, you can use the public access URL.
- Checkout and commit access (private): svn+ssh://in.cns.iu.edu/projects/svn/nwb
- Checkout only (public): https://in.cns.iu.edu/svn/nwb/
You can find out more about the various CNS source code repositories here. For this walkthrough, I'll use the private access SSH method, but the steps are generally the same for the public access SVN.
In this tutorial, I'm going to be pulling code for the Sci2 project from trunk. Trunk is a standard SVN top-level sub-directory and is considered the main body of development, or the most stable branch. I will be importing from the private SVN trunk directory. Here are the SVN paths for trunk:
- Private SVN trunk: svn+ssh://in.cns.iu.edu/projects/svn/nwb/trunk
- Public SVN trunk: https://in.cns.iu.edu/svn/nwb/trunk
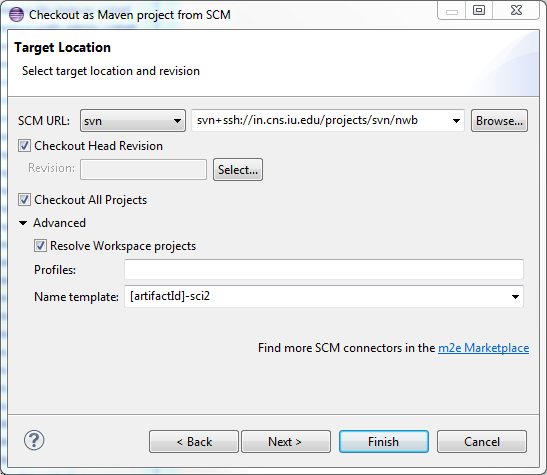
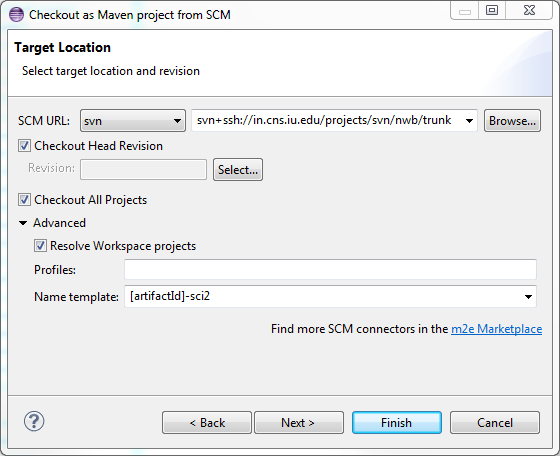
- Go to
File->Import...on the Eclipse toolbar - Select
Check out Maven Projects from SCM, then clickNext - For
SCM URL, selectsvnfrom the drop down menu, then paste your SVN URL to the right of that
- Most developers prefer to append a name to all projects imported from a certain repo. You can do that using the
Name templatefield, as shown. Then clickNext - Leave this screen as is and click
Finish - Maven will now pull all the code from the SVN repo and import it. This may take some time. In this case, the parent project was designated as
parent-sci2in my repository. You'll use the parent project to manage the Maven build process.
Building with Maven
- Right click the parent Sci2 project (named
parent-sci2in my example), then clickRun As->Maven build... - In the window that pops up, type
clean installinto theGoalsfield. This will perform a Maven clean, followed by a Maven install command - Click the
Runbutton. This may take some time. If the build process stops with the messageBUILD SUCCEEDEDin the console, then congrats, you're done. If instead you seeERRORseveral times, read on
Troubleshooting the Build Process
OpenCSV Error
When doing a Maven clean install, you may sometimes encounter this error which prematurely ends the build process:
[ERROR] Cannot resolve project dependencies:
[ERROR] Software being installed: edu.iu.sci2.javaalgorithms.feature.feature.group 1.0.0
[ERROR] Missing requirement: edu.iu.sci2.javaalgorithms.feature.feature.group 1.0.0 requires 'opencsv [2.2.0,2.2.1)' but it could not be found
[ERROR]
A workaround for this issue is to actually go into the project in question (in this case, edu.iu.sci2.javaalgorithms.feature) in your Eclipse workspace and edit the feature.xml file:
- Open
feature.xmlin the Eclipse editor - Select
feature.xmlat the bottom to view the rawxmltext - Find the
<plugin ... />item with anidvalue of"opencsv"(sometimes"opencsv.source") - Change the
versionvalue to"0.0.0"- this will pull in the latest version of OpenCSV instead of requiring a specific version - Save the file
Now attempt the Maven clean install command again, as described before. You may also have to make this "fix" to the edu.iu.sci2.source.feature project as well.
Bipartitenet Compilation Error
Some have reported running into this issue, which is more rare but still occasionally pops up when building Sci2:
[ERROR] Failed to execute goal org.eclipse.tycho:tycho-compiler-plugin:0.14.1:compile (default-compile) on project edu.iu.sci2.visualization.bipartitenet: Compilation failure: Compilation failure:
[ERROR] C:\Users\username\workspace\parent-sci2\sci2\plugins\normal_plugins\edu.iu.sci2.visualization.bipartitenet\src\edu\iu\sci2\visualization\bipartitenet\model\Node.java:[30,0]
[ERROR] static final Function<String,Double> EXTRACT_DOUBLE_VALUE = new Function<String,Double>() {
[ERROR] ^^^^^^^^^^^^^^^^^^^^^^^^^
[ERROR] The blank final field FLOATING_POINT_NUMBER may not have been initialized
[ERROR] 1 problem (1 error)
The fix is to alter a source file, Node.java, which causes the issue:
- Go to the directory of
Node.javadescribed in the error message- In this case, it is located in the Eclipse workspace directory at
parent-sci2\sci2\plugins\normal_plugins\edu.iu.sci2.visualization.bipartitenet\src\edu\iu\sci2\visualization\bipartitenet\model\
- In this case, it is located in the Eclipse workspace directory at
- Open the
Node.javafile in a text editor - Remove the
finalkeyword for the variable declarationEXTRACT_DOUBLE_VALUE - Save the file
At this point, attempt the Maven clean install again. It should now proceed without errors.
Locating the Finished Build
- Inside of your Eclipse workspace directory, locate your parent Sci2 directory, which in my case was named
parent-sci2 - Inside of this folder, go to
sci2/deployment/edu.iu.sci2.releng/target/products - In this folder, there should be several compressed folders, each for a different system type
- Locate the one for your particular system and extract it to a new directory
- Go inside of that new directory, right click on the Sci2 application (
sci2.exe), and create a new shortcut. Right click on the shortcut and go toProperties. At the end of theTargetline, after a space, type "-clean -console". This will aid with adding new plugins and debugging. - Launch the shortcut to run Sci2